How to Change the Login Screen Background in macOS Big Sur
You can customize your login screen on your Mac. This article describes how you can change your macOS Big Sur login screen to display any image you want when your Mac turns on. Here is how:
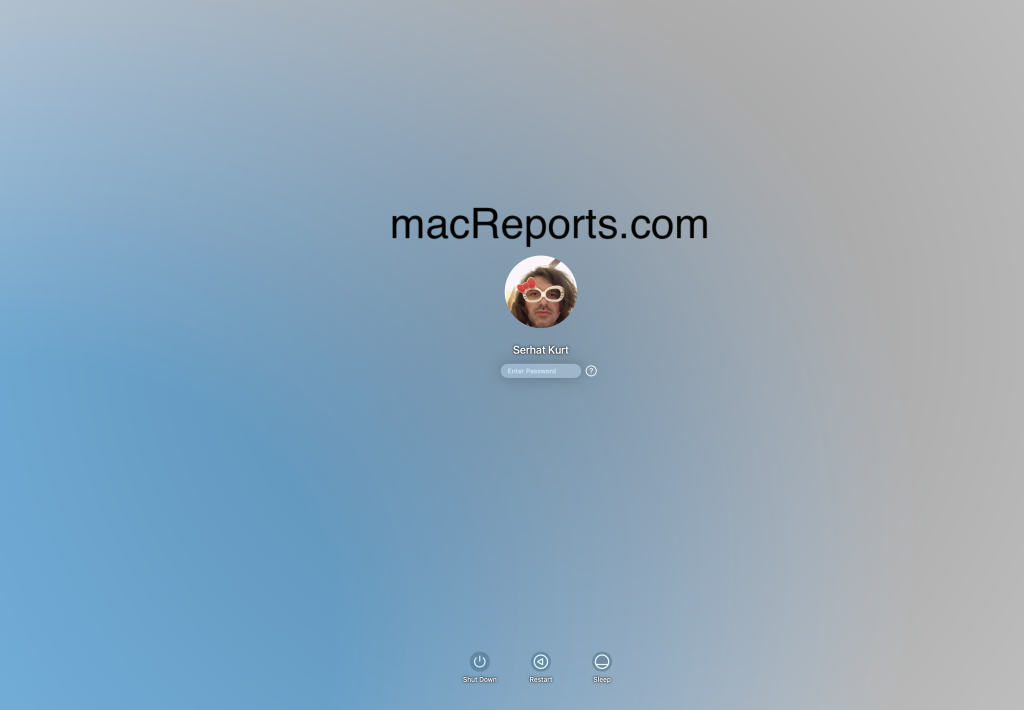
The login screen is where you enter your password.
See also:
- macOS Catalina: How To Change The Login Screen Background
- How to Change the Login Screen Background on macOS Mojave
How to change the Big Sur login screen
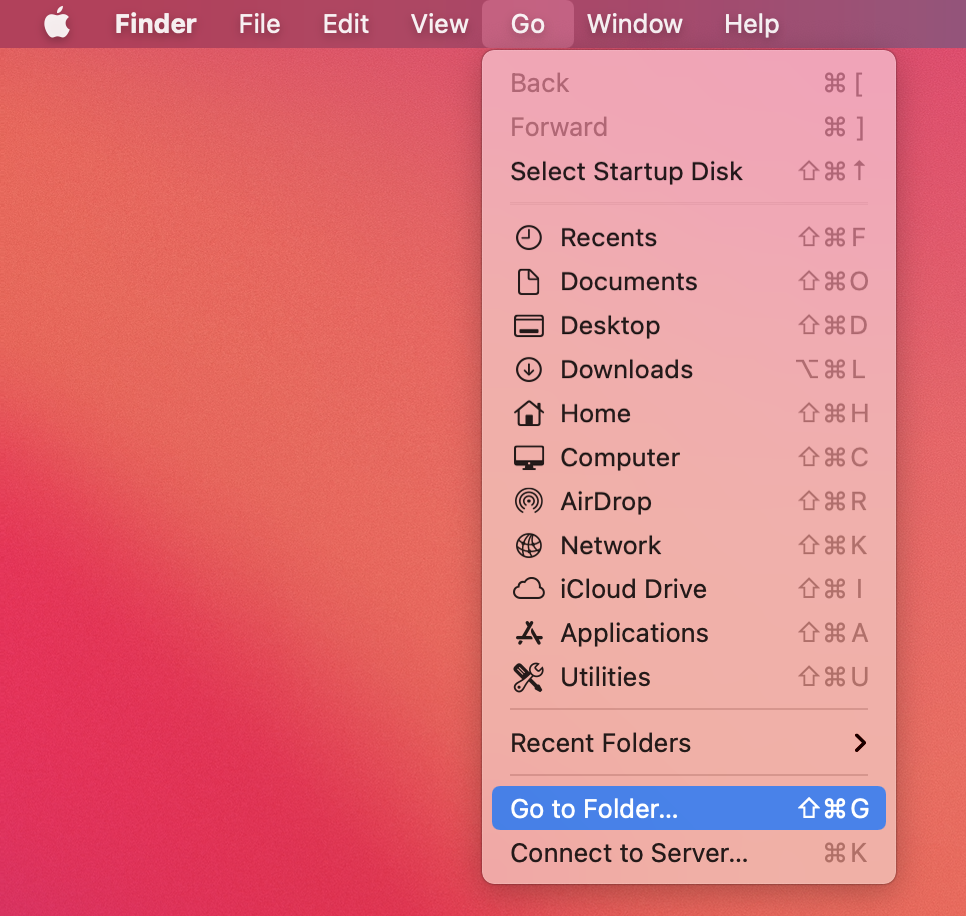
1. On your Mac, in the Finder, choose Go > Go to Folder.
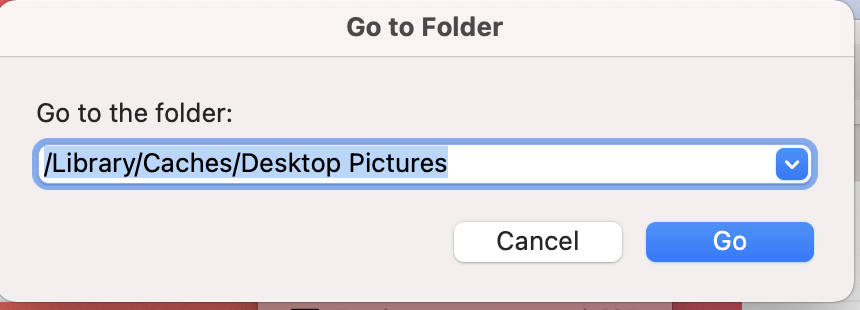
2. Type the following pathname and click Go.
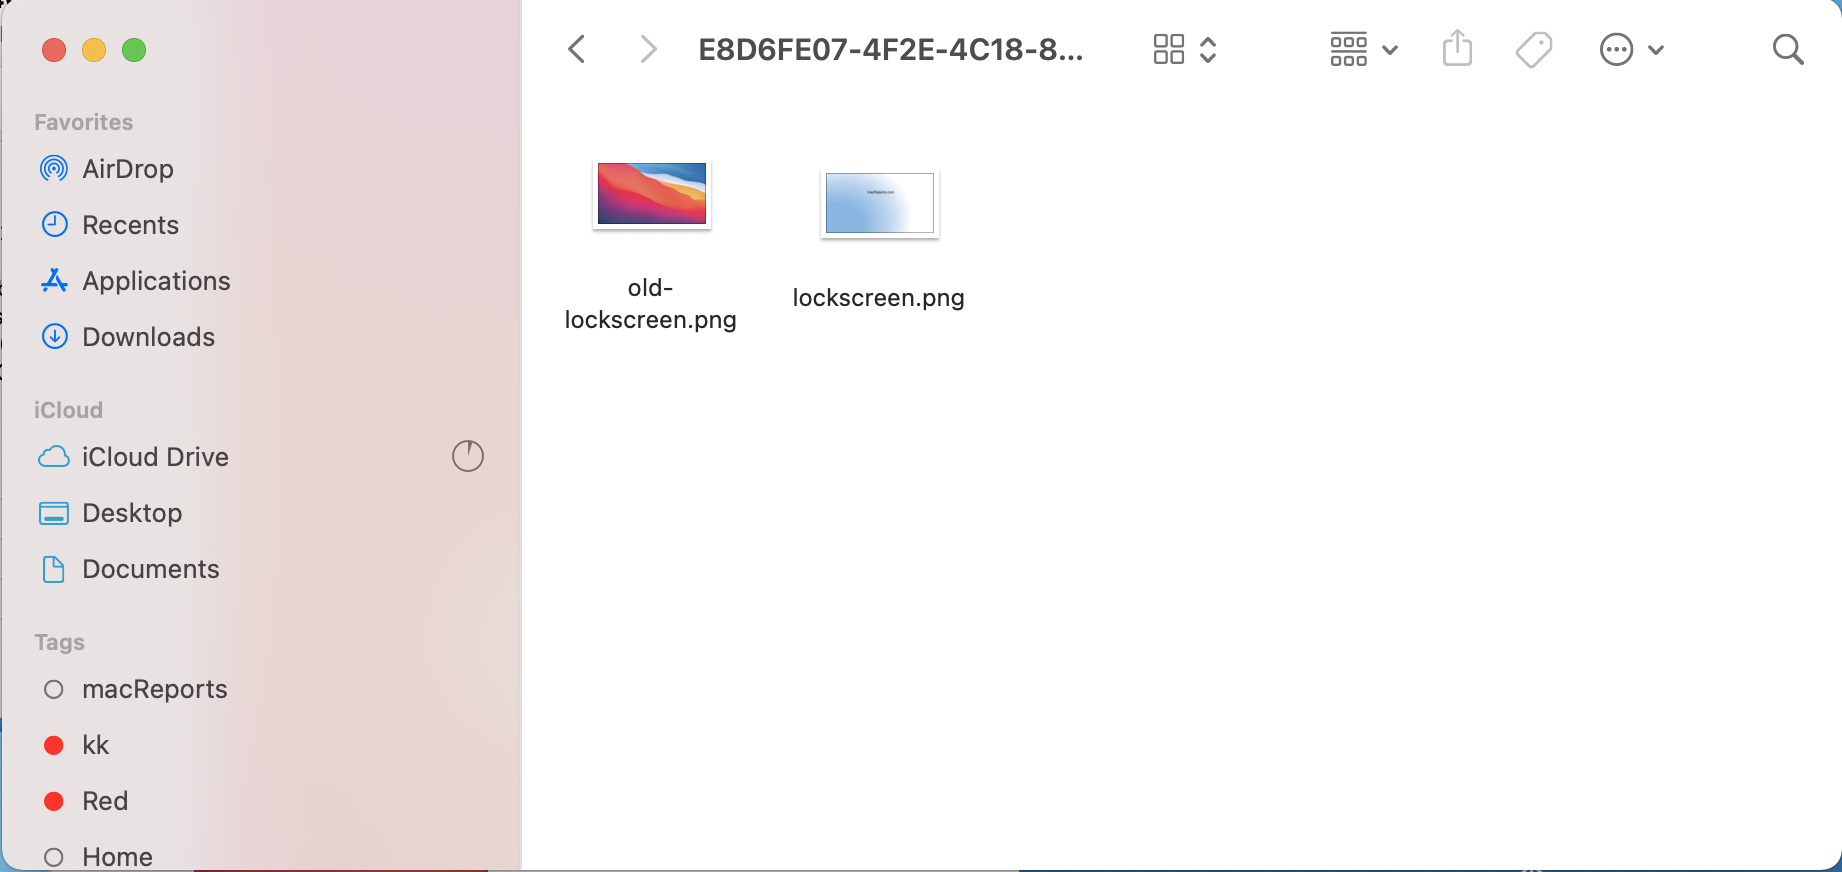
/Library/Caches/Desktop Pictures
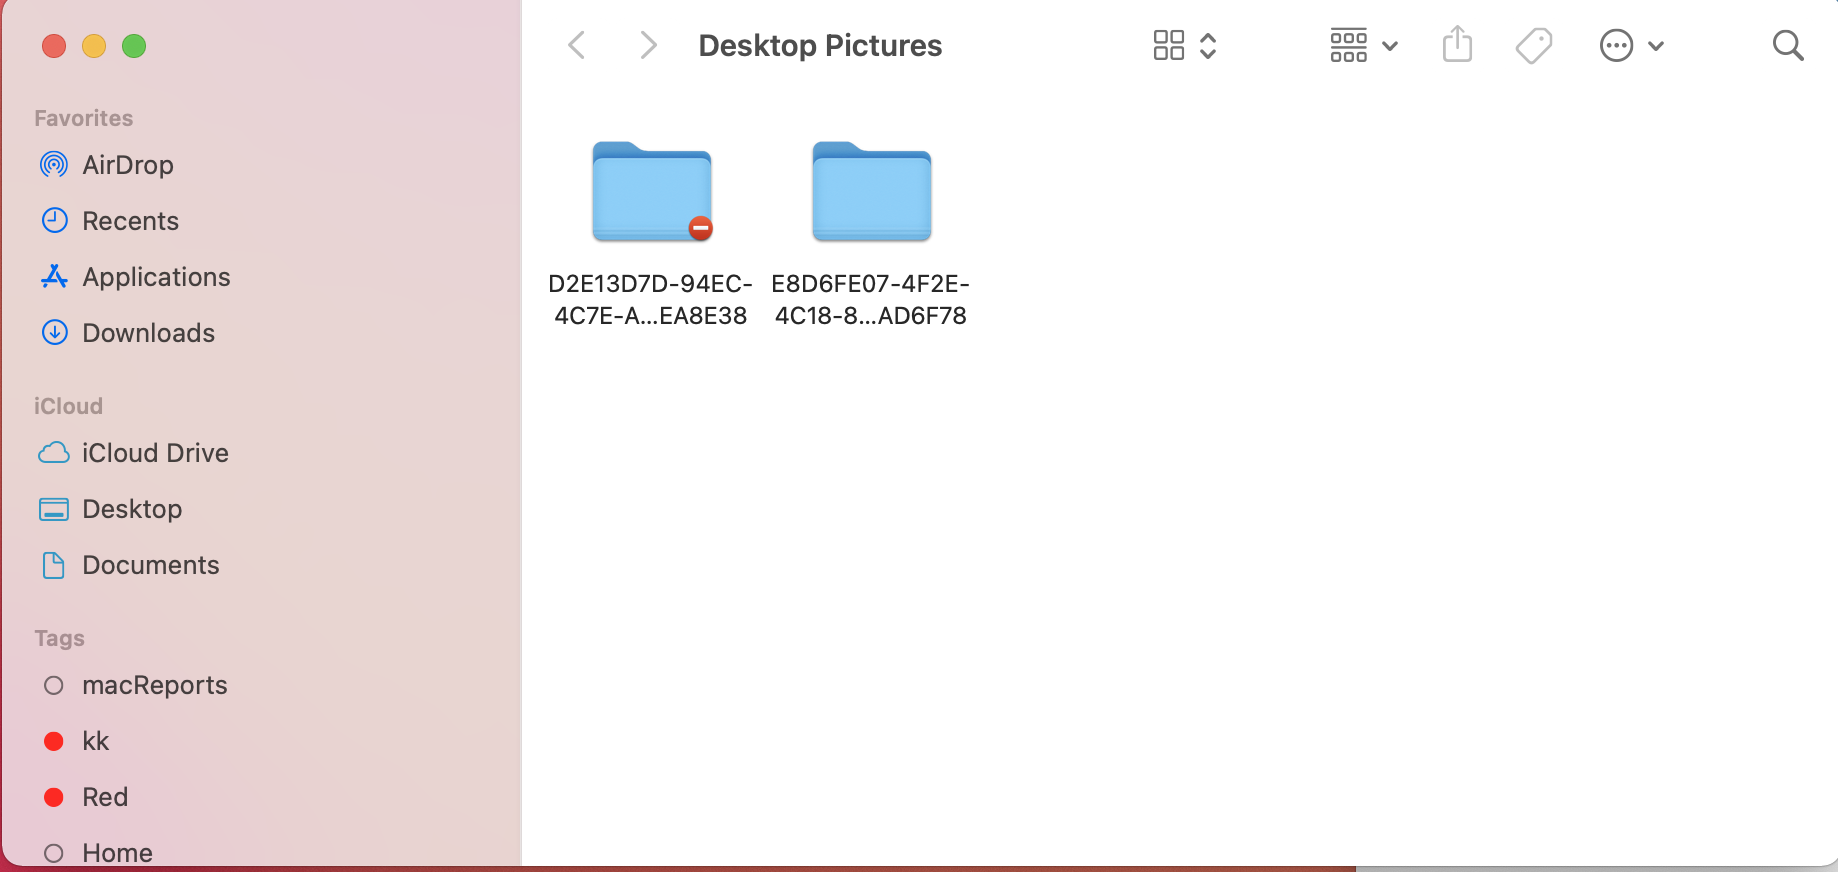
3. In this folder, you will see one or more folders. The folders are named after the name of the user’s UUIDs. Open this folder and you will see a file named “lockscreen.png”. Please note that if you do not have a folder named Desktop Pictures, create this folder inside the Caches folder. Then you will need to create a folder with UUID value as name inside the Desktop Pictures folder (see below).

Furthermore, If Desktop Pictures folder exists but if you do not see a folder inside the Desktop Pictures folder, you will again need to create one UUID value as name. Here is how.
See also: How To Screenshot (Print Screen) And Record Screen On Your Mac
A. On your Mac, open System Preferences and click Users & Groups.
B. Click the Lock icon and enter your passcode to unlock this section.
C. Right click (or control-click) on user name and select “Advanced Options…”.
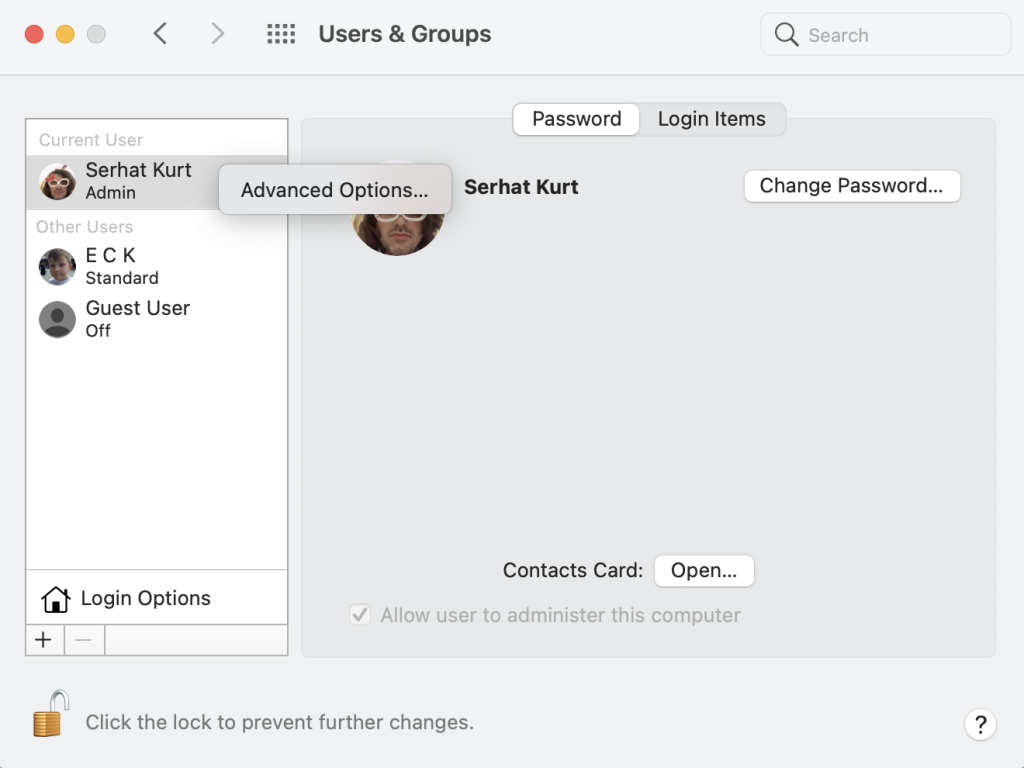
D. Now, copy the UUID of your User-ID.
E. Now go to the “/Library/Caches/Desktop Pictures” folder again. And create a new folder. The name of this folder should be your UUID.
F. Now right click this new folder and click Get Info. Make sure that your computer has Write privileges. Grant permissions Read & Write to user, admin, everyone.
See also: Mac: How To Troubleshoot Screen Flickering
4. Now select the current lockscreen.png image (if you have this image in the folder) and rename it old-lockscreen.png.
5. Now find an image or photo that you want to use as your login screen background and drag-and-drop the image (name it lockscreen.png) into the open folder.
Now restart your Mac and you are done.
See also:
Neither the Serhat Kurt’s nor Nick Beacham’s solutions work for me. Serhat’s procedure only changes the LOCK background, not the login background. I meticulously followed Nick’s instructions but his procedure resulted in a “read only file system” message when I tried mv /Volumes/Macintosh\ HD/Big\ Sur\ Graphic.heic. ☹️
Found the answer, apparently /System/Library/Desttop Pictures/Big Sur Graphi.heic is where the login screen background loads from.
To change it:-
boot into the recovery mode
open terminal
type: csrutil disable
press enter
type: mount -uw / /dev/diskXsY <–
Attention!!! X=your Big Sur disk from 'diskutil list'
Y=your Big Sur disk slice
Now the Big Sur volume should be writable
6. Reboot normaly
7. name your own grafic image as Big Sur Graphic.heic
8. copy your own grafic image in to Macintosh HD
9. reboot into the recovery mode
10. open terminal
11. type: mount -uw / /dev/diskXsY <–
Attention!!!! X=your Big Sur disk from 'diskutil list'
Y=your Big Sur disk slice
12. type: cd /
13. type: cd /Volumes/Macintosh\ HD/System/Library/Desktop\ Pictures
14. type: mv /Volumes/Macintosh\ HD/System/Library/Desktop\ Pictures/Big\ Sur\ Graphic.heic /Volumes/Macintosh\ HD/System/Library/Desktop\ Pictures/Big\ Sur\ Graphic.heic.orig
15. type: mv /Volumes/Macintosh\ HD/Big\ Sur\ Graphic.heic /Volumes/Macintosh\ HD/System/Library/Desktop\ Pictures/Big\ Sur\ Graphic.heic
16. Reboot
Now you have your new login background
17. Reboot into the recovery mode
18. open terminal
19. type: csrutil enable
20. press enter
21. reboot e voilá
¯\_(ツ)_/¯
legend
I used your setps above and added some photos of my own to the folder , choosing one as “login.png” and renaming the other “old-login.png” >I have two users one of them amin, one standard. When I reboot standard login screen comes up as changed (new) login BUT if I logout/or choose not to login as standard account the login screen revertys to old-login.png THAT DREADFUL ORANGE WAVY THING! Why?
I’ve had an odd experience with my new Mac mini M1 on Big Sur. With no action on my part whatsoever, the Mac just picked a photo from my Photos library as my log-in screen photo. Fortunately it’s of my husband and our dog, but I didn’t do it!
The only thing I can think of as perhaps affecting this is my efforts to get the actual Desktop to randomly cycle. The checkbox was grey no matter which included Desktop pic I selected. I was able to highlight my own Photos, pick an album, and suddenly the checkbox appeared. When I picked a the Favorites folder, it cycled fine. Went back to the stock pics, and this time the checkbox stayed checked. Mac has been cycling the Desktop just fine. First restart, and the pic of my husband and dog appear.
Does anybody have any idea how this happened?
It appears that several users have slightly different file structures. Are we all using 11.3.1?
Having several users does seem to change the requirements to effect the change.
My own experience has the folder: Lockscreeen.png NOT containing the login screen background but the general colour background.
The methods outlined by previous cpmmenters work when the login page has one user. They do not work for a login page with multiple users.
There are TWO lock screen images, which this article does not make clear. There is USER one that you can change, and a SYSTEM one that you cannot (easily).
This article is about the User lock screen image. This screen appears when lock your computer. It will also appear on restart if you only have ONE user profile.
The System lock screen will appear when you restart a machine with MULTIPLE users because the OS has no idea which user is about to login. It will also appear if you select Login Window from your profile pic on the upper right menu bar, or Switch User from your lock screen.
If you think about the way an OS is organized, this makes sense. All UI customizations are at the User level, not System level. Users should not automatically see other peoples lock screens either after a restart, they are private by default like your Documents, Downloads and Browser History.
However I also think it is incredibly annoying, and Apple should allow local admins to change the System lock screen, but perhaps they have security or technical limitations that make it infeasible.
Click on the Apply icon. Select System Preferences. Click on Desktop/Screensaver icon. Click on Desktop. Click on Photos and choose a photo from your own gallery. I’m not a techie, but this was really easy for me. Now one of my own photos comes up, not that awful Desktop color scheme.
I am having the same problem as Becky, neither method works for me. I did go to my Macintosh HD/Library/Cache and found folder Desktop Pictures and made sure the new UUID folder held my new lockscreen.png image. When I restart, it is still on that nauseating multicolored image.
And suggestions would be so appreciated!
Lia- p.s. the existing Folder is not “locked”. The picture is my own picture which opens in the Start Page. There is no picture of the horrible Big Sur (red etc) within this folder. The tutorial shows a Folder which has the “forbidden” seal on it. I do not have this it seems. Thanks again.
Thank you ….however…..Macintosh HD/Library/Caches/Desktop Pictures (NOT the system library) contains a Folder with UUID and a subfolder lockscreen.png.
However, I did not manage to create a 2nd folder with my UUID. Does one need to import another picture in the already existing folder? Thanks for your answer. Best wishes, Lia
This method worked perfectly for me. The ridiculous pink irritant is gone!!!
Got it to work after realising there are 2 different Library folders on the mac. The one the article pointed to was wrong for me. But when you go to Macintosh HD/Library/Caches and create the Desktop Pictures folder in there, then follow the rest of the instructions, it works!
I hated the red/blue screen so much I wanted to throw up. Thanks so much for the article. Made my day when I saw my old Catalina calm island pic come up.
Hi, I can’t change it via the method in this article either, its driving me crazy. I tried to go to the folder you suggested but when I type it in all I get is a ping sound and it goes to Desktop-Local.
Did you create it in there? I’m really not sure why it won’t work and the bright colours on the log-in screen give me a headache 😛
Any help?
Thank you!
Tried creating a new desktop pictures directory in caches, then a new folder with UUID name, with new lockscreen.png. Made sure everyone could read & write. Still have the horrid red, yellow, blue art screen on restart.
I can find the file of the ugly pink photo but I do not know how to change the default login screen.
Macintosh HD > System >Library >Desktop Pictures
I have done everything but it seems not working at all.
Besides, I can’t find that “red image” in the file “desktop pictures”.
Is there any possibility that file with the red image inside has change it’s place?
I had to delete the UUID named folder in /library/caches/desktop pictures and recreate it with the new lock screen.png before it would work.
Dosnt work on Big Sur. Turn of filevault and all screens switch to using your desktop wallpaper.
Must be a big somehow.
When a forced restart is applied, it will return to the original image.
This method should work for a computer with only one user. I have an Admin account and a Standard User account. The User account had the Desktop Pictures folder in Caches, the Admin one did not, I created the Desktop Pictures folder and added the UUID for the Admin account as a folder underneath. Plus I had FileVault turned off temporarily.
I then updated the lockscreen.png file in both accounts in their separate UUID folders and it works for changing the background on the screen you get after you select a user when you power up. This is the screen where enter your password after you select the user.
It unfortunately does not work for the very first logon screen that is displayed after powering up. Big Sur must have another location where it stores this particular wallpaper file with multiple user accounts. Crazy.
Any ideas about that location?
Can’t find where to change the dang thing! I can change the “login page” background and the sleep background, but I’m talking about the awful Red page you see when you turn on the iMac computer, where you choose the Icon of who will be logging in! It’s a awful Red color and I’ve Googled until my fingers are red and tried all the Fix-it’s but none actually work! HELP!
I followed the instructions and nothing worked. The login screen provided on Big Sur is horrible. It should be easy to change as desktop pictures.
Perfect, i followed the instructions and I have my new loginscreen after the restart. I created Desctop Pictures and included the folder with the UUID with the new picture. Thats all.
Josef Niggl
Thank you! Did not have multiple users and did not see the ugly pic and just a empty UUID folder and after unlocking the vault I added the picture I wanted to that UUID folder and it worked.
Dear friend,
I have to correct my message from the last week and congratulate you to showing the right path for changing Big Sur login screen.
When it had not work for me first, it was my fault because I did not realize that in the Desktop Pictures’ Info I did not ‘grant permissions Read & Write to user, admin, everyone’ – the permission was by default granted only for the administrator ….
Once I had done it, all worked as predicted by you.
Thank you again
Anton Peter
The image that is the lockscreen.png is the one I want already…however the “ugly” BS graphic is what I see when I turn my MBP on–so we’re not quite “there” with this.
I’m quite frankly surprised by how difficult this is given how being super customizable is a hallmark of Mac. Please APPLE, I’m begging’ ya: please make it ridiculously simple to get rid of this hideous graphic at login/sign on (PS–I’m the only user on my MBP and all the directions here helped, but the pic to change the name on was not the ugly graphic…that is like a ghost in the machine.)
I have the same situation. Did you find a solution?
I wanna know why, after spending decades battling for legitimacy as a “real” computer, Apple decided to foist this bastard child of Fisher-Price and Windows 8 upon us. The UI changes brought by Big Sur are meh-to-blech.
this method only works if you disable file vault
Thanks Tony, that worked
disabling FileVAult (by mistake) before installing Big Sur, took me 24 hours……3 hours to re-enable it again. Since then I’ve all kind of problems
Wait until the BS version of ONYX will be available to download
I did none of that and was able to change my lock screen through system preferences > Desktop/Screensaver
sorry pal, there is a difference between desktop picture and lockscreen, what your changing is not the lockscreen
Didn’t work. I have the Desktop Pictures in the Cache folder and there is the UUID folder that contains the lockscreen.png. I followed the directions. After doing either a Restart or a Shutdown (which I figure does a more complete reset of system stuff that does the Restart), I still had the ugly login screen. Then I checked the lockscreen.png file using Get Info and the picture is shows is my nice Desktop picture, not the ugly login one. Don’t know where it is pulling the ugly one from.
Same here, Jim. The lockscreen.png image in the folder is the one I want, but and it’s the only image in the folder. However, my login screen image is still the Big Sur image.
Yep. Same here. This changes the desktop wallpaper not the screen where the login prompt is.
Try turning off your FileVault temporarily. It worked on mine only after I turned it off before restarting. Also, make sure the new lock screen is the same size as your display (About This Mac>>Displays)
This worked for me! after following all the previous steps of course too, thanks!
Took me 24 hours before completing disabling FileVault. When enabled, I installed Big Sur . Unsure what causes the hiccups I have now, like frozen screens, startup: keyboard needs to be reset etc…
Same here. It’s so frustrating to have to go to such lengths to change the login screen, especially when I can’t get it to work. I’m not sure I want to change the SIP so I’m stuck with that awful image!
I’ve found the problem and resolved it. I had created the folder and added the new image to this folder ~/Library/Caches, i.e. with the tilde. Once I changed this to /Library/Caches and created the Desktop Pictures folder it worked.
Did you use the SYSTEM/Library/Caches or the Macintosh HD Library?
It doesn’t work fully. It changes literally only the login screen, that one which is showed when you have to choose an account. On the guide it is written that it should change also the background when mac is turned on. Instead, that horrible wallpaper remains the same. Any suggestion on how to change that image?
This method does not work if you have more than one user.
I changed the lockscreen image on all users and still have the problem of having the default login screen.
Hey, John! I wonder if you have managed to change it? I have a few users as well, and I am desperately looking for a method to change this ugly screen.
please tell me
There is neither a folder called Desktop Pictures nor lockscreen.png in / Library / Caches /
Thanks for the info but sorry, this does not work. In my library I have one folder called “Caches”, with three subfolders: “ColorSync”, “com.apple.cloudkit” and “com.apple.iconservices.store” (this file is locked by the way). In my library I also have a separate folder called “Desktop Pictures”containing about 34 jpg files. There is no such a thing as a “desktop Pictures” folder within my caches. So, then what to do? Create a new folder in where exactly? As a result of the above seeming inconsistencies in the pathways that are referred to in the article I am not sure that the article is 200% accurate so I will not experiment at this stage. Please kindly clarify, thank you.
This worked for me, need create desktop pictures folder in that cache folder, then create a sub folder and name it with your UUID, restart then lockscreen.png should appear in that sub folder, article is correct