How to Use Recovery Mode with your iPhone or iPad
Recovery Mode can be used to restore your iPhone or iPad when you are having a problem with your device. One of the most common times you would need to use Recovery Mode is when something goes wrong while attempting to update your iPhone (iPad) to the latest iOS (iPadOS). Some of the times when you may want to use Recovery Mode include:
- You want to erase your device but can’t do so on the device itself – for example if the touch screen isn’t working.
- Your iPhone or iPad gets stuck. If your device is stuck showing the Apple logo screen (with no progress bar) you may need to use Recovery Mode to restore your device.
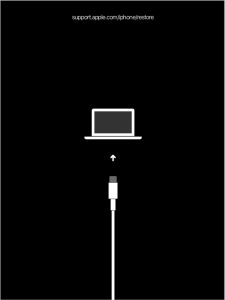
- If there is a problem with your device, you may see the Recovery Mode screen. When this screen appears on your device, you should connect it to your computer and use Recovery Mode.
See also:
Note: This is different than macOS recovery mode.
Put your Device in Recovery Mode
Before you begin, if you are using a Mac, make sure your Mac is up to date. If you are using iTunes on a PC, make sure you have the latest version of iTunes.
Restart your Device in Recovery Mode
- Open Finder (macOS Catalina or later) or iTunes (macOS Mohave or earlier, or a PC).
- Connect your device to your computer via the appropriate USB/lightning cable.
- Put your device in Recovery Mode:
- iPad with Home button, iPhone 6 or earlier: Press and hold both the Home button and the Top (or Side) button. Continue holding them until the Recovery Mode screen appears.
- iPad without Home button, iPhone 8 or later: Quickly press and release the Volume Up button followed by the Volume Down button. Press and hold the Top (or Side) button until the Recovery Mode screen appears.
- iPhone 7: Press and hold both the Side and Volume Down buttons. Release when you see the Recovery Mode screen.
Find your Device in Finder or iTunes
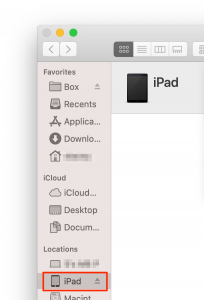
- If necessary, locate your iPhone or iPad in the left-side pane of the Finder (iTunes) window.
See also: iPhone or iPad not Showing up in Finder on Mac, Fix
Update your iPhone/iPad
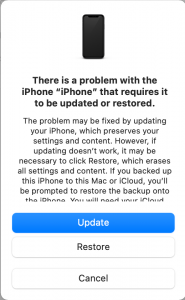
- You should see a pop-up telling you that there is a problem with the iPhone (iPad) that requires it to be updated or restored.
- Select Update. This should reinstall the software without erasing your data.
- Follow the prompts to install iOS/iPadOS.
- If your device exits recovery mode without finishing, wait a few minutes, then start over.
See also: How To Fix Your Dead iPhone
Restore your iPhone or iPad to Factory
If necessary, after updating the software on your iPhone or iPad, you may follow the steps again to put your device into Recovery Mode, but this time choose Restore, instead of Update. This will wipe your device. You will want to do this step if:
- You are looking to erase your device because you are selling it or because you are sending it in for service.
- Updating in Recovery Mode failed.
See also: Set Up a New iPhone: How to Transfer Data from your Old iPhone
How to Exit Recovery Mode
If you have successfully used Recovery Mode to Update or Restore your iPhone, it will automatically exit Recovery Mode when it restarts. If you have entered Recovery Mode and want to, or need to, exit:
- Unplug your device from the computer.
- Follow the steps to Force Restart your device. This will be the same button press sequence that you used to put your device into Recovery Mode – you just won’t have your device connected to your computer.
If you are having trouble with your iPhone or iPad that could not be fixed by resetting it in Recovery Mode, contact Apple Support.
Recent Articles:


