macOS Catalina: How To Change The Login Screen Background
You can change the login screen wallpaper image that appears when you start your Mac to any image you want to use. We previously wrote about how you can change the login screen image in macOS Mojave. It seems that it is a little harder to change this background image for the login screen wallpaper now but it is still possible. You may want to do this so that you do not have to stare at the generic Catalina image every time you type in your password.
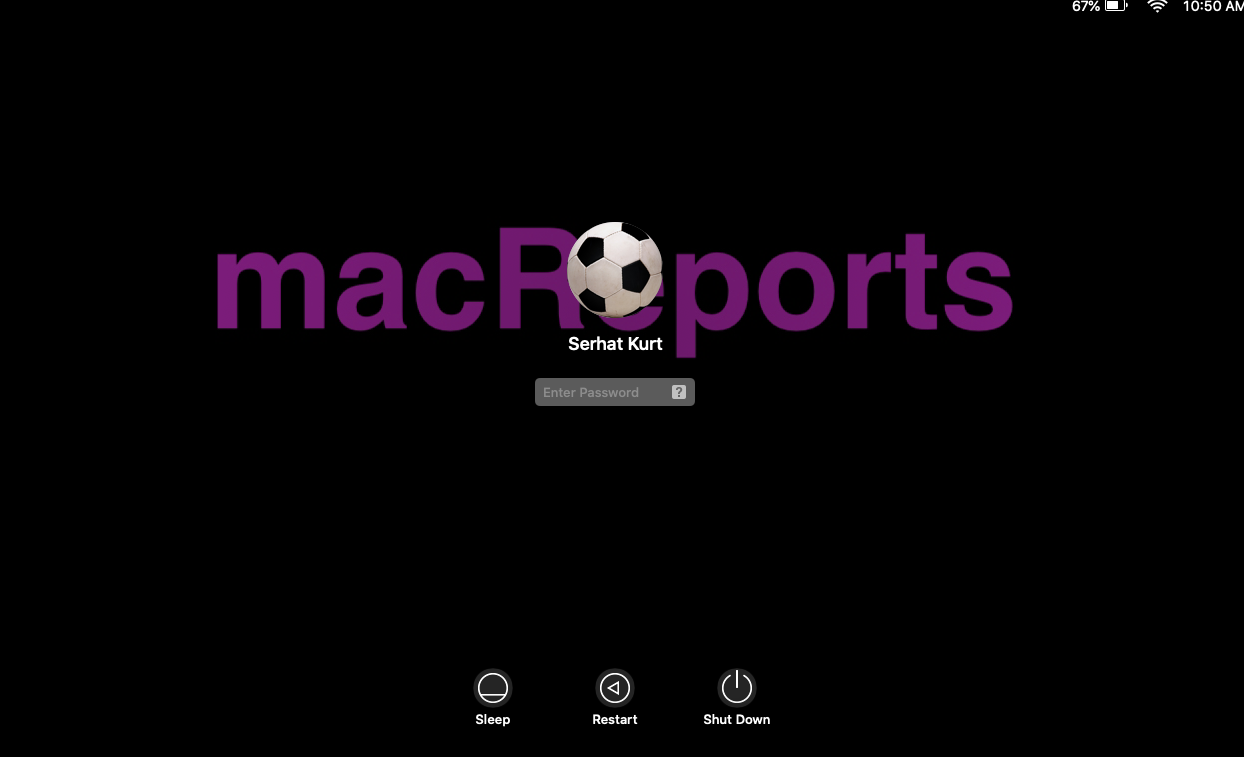
macOS Catalina custom login screen
Here is how:
Please follow each step carefully:
1. Find or create the image you want to use. You can find it online. You can create one yourself. You can modify using the Preview app or using any other photo editing apps. This will be your login screen. I created a basic solid black image. See below. Save this image anywhere you want on your computer (e.g, Desktop etc). Just make sure that you can easily find it as we will need this later. There are different types of image formats. Your image can be a JPG or PNG (the most common types). 
2. Rename this file as Catalina.heic (HEIC files)
You can rename it by selecting it and hitting the ‘return’ key and entering this new name.

3. Now we will disable System Integrity Protection. Do not worry we will re-enable it after we are done. And this can be done via Recovery Mode. Here is how:
- Turn off your computer
- Turn on your Mac and immediately press and enter the Command (⌘)-R keys. Keep these keys when you see a login or the recovery mode screen.
- You will be asked to enter your password
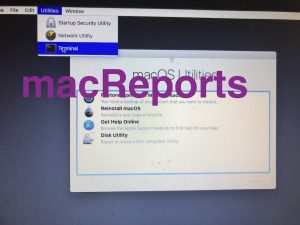
- After starting up from macOS Recovery, click Utilities (from the top menu)
- In terminal enter the following command and press enter (this will turn off System Integrity Protection)

csrutil disable
- Restart your Mac by going to the Apple menu and Restart.
4. When your computer restarted, open Terminal (Applications / Utilities or you can use Spotlight) and enter the following command and hit enter:
sudo mount -t apfs -wu /dev/disk1s5 /Volumes
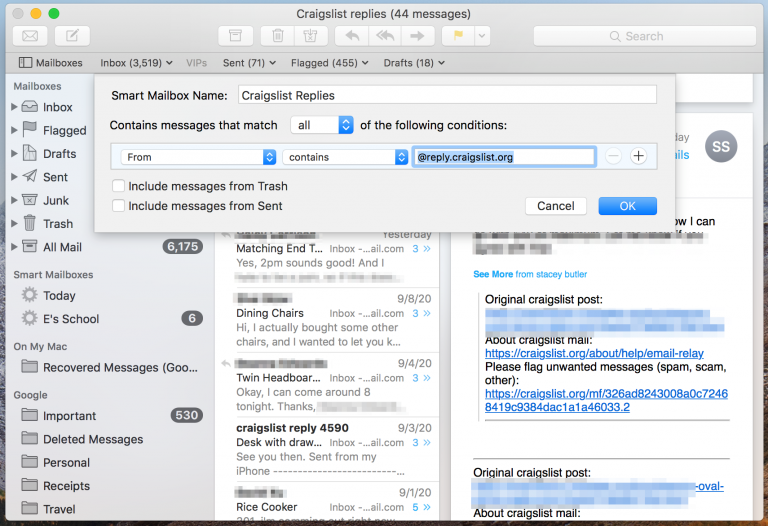
Make sure that you replace ‘disk1s5’ with the identifier for your system. If asked, enter your passcode. if you do not know this, open Disk Utility (Applications / Utilities or you can use Spotlight) and select your disk (sidebar) and then click the Info icon.

5. Again, in Terminal enter the following command and press enter:
sudo mount -wu /; killall Finder
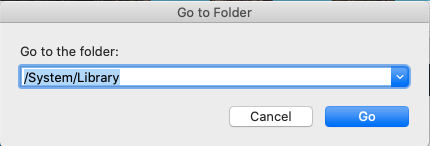
6. Now go to Finder, click Go and then Go to Folder and enter /System/Library and click Go.
7. Click Desktop Pictures folder
8. There you will see a lot of images. Find Catalina.heic and rename this file like Catalina-original.heic, (just in case if you want to change it back).
9. Now copy and paste the heic image that we created (step # 2) in here (System > Library >Desktop Pictures)
10. Again open the Terminal app and enter the following code and hit enter:
diskutil apfs updatePreboot /
Wait until the Terminal app completes the process.
11. Restart your Mac, and now you will see that your login wallpaper is changed.
Important: Now, let’s re-enable System Integrity Protection as this will help protect your Mac from malicious software. Here is how:
- Restart your Mac in Recovery Mode (see the step above #3)
- Open the terminal and enter the following command and hit enter:
csrutil enable
Restart your computer. Now System Integration Protection is enabled. You can check this by going to the System Information app (Applications / Utilities). Click Software and check to see if you see this “System Integrity Protection: Enabled”
You can find below the easiest way to change your lock-screen picture on MacOs Catalina:
1. System Preferences > Security&Privacy > make sure FileVault is off.
2. System Preferences > User&Groups > Right Click on User after you unlocked settings > Advanced Options > Copy UUID
3. Go > Library/Caches > Make New Folder and rename to Desktop Pictures > Right click on the folder > Get info > Below where Sharing&Permissions is > make the admin read&write.
4. Open the new folder named Desktop Pictures > Make another folder and name paste the UUID as the folder’s name > Get info on the new folder > make admin read&write as well.
5. Reboot mac.
6. Acces Library/Caches/ Desktop Pictures/ UUID folder > change picture with anything you want.
7. Reboot computer.
Did not work for me. I put the picture I wanted (a JPEG) into the UUID-named folder, rebooted, and got the same supervillain-volcano image on my login screen. Added the Administrator with read&write to the permissions on the JPEG, rebooted again, same result. Converted the JPEG to HEIC, added Administrator with read&write, rebooted. Login picture still unchanged.
Does the file in the UUID-named folder need to have a special name? I feel like the instructions got really vague at step 6…
Thanks Norbi!! this worked perfect for
me 🙂
This worked a treat under Catalina, but not Big Sur. All okay up to Step 5:
sudo mount -wu /; killall Finder
where I get the response
mount_apfs: volume could not be mounted: Permission denied
mount: / failed with 66
Really appreciate it if anyone can help. I hate the Log in BG…
Cheers from London, Brett
I’ve found a solution which I have written in here.
which I have written in here: https://apple.stackexchange.com/a/400036/333137
i think in most cases it is the missing of a folder in “/Library/Caches/Desktop Pictures”
this must be created with the name of the user’s UUID. In addition, the rights for the system to write must be set.
after that macOS should put a “lockscreen.png” file for the login there again.
Should work for Catalina and Mojave.
oliver (and norbi) – yours are the best solution. works perfectly and i have been doing this every iteration of macOS after updating.
keep in mind for those reading, “lockscreen.png” must be in the caches folder. one could rename their favourite png image to lockscreen.png and place it there. furthermore, one could have a different desktop image and lock screen image simply by locking the lockscreen.png via the Get Info window before changing the Desktop Picture.
Great it works thanks, but please how to reverse this ?? I’m still getting System mounted on each start. any solutions ?
This worked perfect for me. MacBook Pro 16’ 2019 …. thank you!!
@athelstane thanks for writing it out more clearly, it was a big help. You need to add a space before /Volumes in step 10.
Also, I had to use a single slash instead of /[system ID] in line 17.
So I printed this out and it worked perfectly!
Thanks for your help.
Having chosen to display, at random, one of my own photos from a folder as a desktop picture, OSX has arrogantly chosen to use the first in alphabetical order as the logon photo. So the procedure listed above is simply not relevant. I need to experiment further. Pretty poor of Apple not to do make this is simple process.
How To Change The Lock Screen
1) Select or create an image and name it: Catalina.heic
2) Go to: Finder > Applications > Utilities > Disk Utility
a) Select Macintosh HD
b) Click on Info
c) Read BSD device node (mine says disk1s1)
3) Shutdown computer
4) Restart computer – holding down the [command] + [R] keys until it boots
5) Select admin account and enter in the password
6) Click on utilities and open Terminal
7) Enter: csrutil disable and press return – you have now disabled the integrity
8) Restart computer
9) Go to: Finder > Applications > Utilities > Terminal
10) Enter: sudo mount -t apfs -wu /dev/[system ID]/Volumes
11) Enter: sudo mount -wu /; killall Finder
12) Go to: Finder > Go > Go to Folder
13) Enter: /System/Library/Desktop Pictures
14) Select image: Catalina.heic and rename it: old.Catalina.heic
15) Drag-and-drop the image you named: Catalina.heic into the open folder
16) Go to: Finder > Applications > Utilities > Terminal
17) Enter: diskutil apfs updatePreboot /[system ID] and wait for it to finish
18) Close all open windows
19) Shutdown computer
20) Restart computer – holding down the [command] + [R] keys until it boots
21) Select admin account and enter in the password
22) Click on utilities and open Terminal
23) Enter: csrutil enable and press return – you have now enabled the integrity
24) Restart computer
the lock screen is a same as your Desktop Picture in System Prefences>Desktop & Screen Saver>Desktop
That’s the image used for the lock screen once a user has logged in, it’s not the startup screen which initial screen seen when starting before any user has been chosen. For MacOS 11.2 aka Big Sur (what’s with the nonsensical OS names?) the image is: /System/Library/Desktop Pictures/Big Sur Graphic.heic
The above process will likely work fine to replace this image with whatever you want. There are also images for Day and Night, but they are just aliases pointing to the Graphic image.
Worked like a charm. But is ist correct that the desktop picture has changed to the same one I just for the login screen? I had wished for two separate ones.
And one more question, doing all that my login password doesn’t show any signs any more. I can type them but they remain “blind” like as you are typing the password in terminal
This worked great, but within a few days, my system became unstable and my computer began to crash weekly. I can’t be sure this was the problem, of course, but after a couple of months I had to reinstall the OS. Just sayin’.
Me too actually.
I have been loving the HEIC images. And, I notice a direct correlation to my system being *weird*, and then crashing (startup disc becomes corrupted, yikes flashing folder with a qusetion mark), and I have to reinstall OS. I haven’t done this bit, but just using custom HEIC images for whismy and fun.
Thank you! You are the man/woman. I’ve been wanting to do this for a while.
Unfortunately, it doesn’t work on my mid 2012 Macbook Pro. As soon as I turn on the FileVault encryption, the login background goes into plan grey and no way to turn it back to Catalina’s wallpaper. While the SSD is not encrypted, the background is fine. I tried your steps to check if the files are there and not corrupted or something.. but everything looks fine. So I have no idea why it is happening.
I have the exact same problem – mine’s a mid-2012 as well.
Dear John- Switch to Boot camp and Windows 10? Are you kidding? Get off this Mac conversation and go back to your clunky operating system of choice.
I appreciate the detailed instructions; however, this did not work for me. Any suggestions would be most appreciated. My guess is the name of the disc is the problem? The hard drive is disc0, there is a ‘container disc1’ that has ‘Macintosh HD’ identified as ‘disc1s2’. first I tried sudo “mount -t apfs -wu /dev/disk1s2/Volumes” and then “sudo mount -t apfs -wu /dev/disk0/Volumes”.
Suggestions are most appreciated 🙂
This was important enough for me to try, and it worked, but there are a couple of rough spots in these instructions, one of which I hope my pointing out is helpful to someone else who might be a bit timid about jumping in.
What is “the identifier for your system”? I found the correct identifier for my system after looking very closely at the screenshot included in that step (#4). The Macintosh HD listed on the left has two entries: the second has ” – data” appended to it. Use the one without ” – data”. The “identifier” is listed as “device” in the list in the screenshot (last item), and, if you follow the instructions’ advice to click on the “info” button (indicated by the arrow), the “BSD device node” on the info list. Hope that is helpful.
It worked but only for my initial log in screen. If I restart I get the changed image, but if I log out it returns to the original Catalina display until I shut down or restart again. Is that how it’s supposed to be? I thought the image would change regardless of how you log off.
It works! Thank you! 😀
This is ridiculously complex for something that should be a simple job. The wisest thing to do is to install Windows 10 using Bootcamp and kick yourself for buying a Mac in the first place, like I do every day.
True, what a hassle for something this simple, reading the comments about the problems people run into while doing this makes me keep the old background, quite annoying
This worked great for me except for one thing. After changing the image, the icons for “Restart” and “Shutdown” on the login screen are all white. Similarly, the characters inside the password box are white as well. Has anyone else encountered this — and do you have ideas for how to fix it? Thanks.
Thanks so much for this. What a palava! In step 9 I had an issue which is not documented here: After renaming the Catalina-heic file to Catalina-original.heic I moved the new Catalina.heic file into the directory but got an error message to say that there was a newer version of this file in the directory and did I want to replace it. I chose to keep both which resulted in the new file being renamed CatalinaCopy.heic. I then renamed that file Catalina.heic and all is well.
followed exactly, checked and double checked, and now i can’t boot…even ran 1st aid in recovery…when clicking info, DON’T choose the first disk listed as BSM…i should have used disk2s5 instead of disk1s5…[bricked]
HELP
after: “sudo mount -t apfs -wu /dev/disk1s5 /Volumes” command not found. Verified identifier of disk. Any ideas?
You need to enter “sudo mount -t apfs -wu /dev/YOURSYSTEMDISKNAMEHERE/Volumes”
In my case it was “sudo mount -t apfs -wu /dev/MacProSSD /Volumes”
Thank you so much! Worked like a charm 🙂
Thank you for the detailed post. Unfortunately I am just too chicken to try this. WAY over my head, and I have used Macs since the original Mac with 128K of memory came out. Each time Apple changes the OS it just gets let reliable, more complex and less intuitive. The original programmers were Very focused on intuitive user interfaces. How about just a “set startup screen”. Apple has forgotten their roots.
I was unable to rename the .heic file or paste the replacement one into /Desktop Pictures folder…?
Any ideas?
you may have missed a step or you may have encountered the same issue I did – see my post to see what I did to get this to work.
How do I replace ‘disk1s5’ with the identifier for my system?
Worked like a charm. Thank you kindly!
So when I load the terminal screen, before the command can be entered, it is prefixed on my Catalina iMac with “bash-3.2#” and entering the command “crsutil disable” after that throws up an error that it cannot find crsutil.
csrutil disable
not: crsutil disable
Wow! This is complicated, however, I have talked to Apple care numerous times and the “expert” tells me they don’t know how. Even went in person to get my computer fixed and asked to change this, several of them tried and were unsuccessful. Soooooo at least you have given some directions. Unsure if I am able but will try.
Simple, easy to follow instructions. Thanks🤓
Thanks this was well documented and easy to follow, I know have my Apple II startup screen back 🙂
I agree with the others, the directions for doing this on macOS Mojave was far simpler
1. Find an image or photo to use as a background photo. It is important that this picture should fit the resolution of your screen. Thus you may want to know your screen resolution. You can find that easily. On your Mac, go to Apple Menu > About This Mac and click the Displays tap. you may find it to be 1280×800.
2. Save this image on the desktop as a .jpg file. You can also find images online.
3. And then rename your image as Mojave.heic (HEIC: High Efficiency Image Format).
4. Now, Open Finder and go to
Go > Go to Folder… (or press Command-Shift-G)
5. Enter /Library/Desktop Pictures/ and then click Go.
6. Find the Mojave.heic file.
7. As a backup method, change its name to something like Original-Mojave.heic (so you can change back later). You may have to enter your admin password.
8. Drag the new Mojave.heic image into the folder and exit (copy and paste). Again you will have to enter your admin password.
9. Restart your computer
10. Done. You’ll see your new background.
Yeah, welcome to Catalina. Apple is bending over backwards to prevent customizations and branding. Such a waste of time for something we should have every right to change on our own. MS is doing similar things in OS10 as well.
Sorry I’m new to Mac. Can you please tell me how do I find out what is the “identifier” of my system, alike disk1s5?
+1 to this question. I’m not new to Mac, but when I do a “df” in my terminal window I see:
/dev/disk1s1 mounted on “/”
/dev/disk1s2 mounted on “/System/Volumes/Data”
/dev/disk1s5 mounted on “/System/Volumes/Data/home”
Open Disk Utility (Applications / Utilities or you can use Spotlight) and select your disk (sidebar) and then click the Info icon.
Its just the name of your system volume. You should see it in Finder. In my case it was MacProSSD
Too complicate for a layman like me, pls make this user friendly as if you just update any wall paper on Mac, pls….
Unfortunately, due to numerous changes to core system functionality in MacOS Catalina, this is the only way to change the login screen background.