How To Screenshot (Print Screen) And Record Screen On Your Mac
Print screen is a key present on most Windows PC keyboards. However, as you probably notice, your Mac computer keyboard does not have a print screen key. In Mac OS, print screen is called screen captures, screen grabs or screen shots. You can easily capture a snapshot of images, pages, windows, menus or screens on your computer. This article provides information about how you can take screenshots on your Mac. This article further explains how you can record your computer screen.
By default, all screenshots are saved on your desktop. You can also change your Mac’s screenshot directory so that you can save it in a different folder.
How to screenshot on your Mac
macOS Majove introduced new screenshot settings and features. With the new Mac OS, you can see all the options you need to capture your screen images. Even you can now record video of your computer’s screen. (See also how to record iOS screen)
Capture your screen
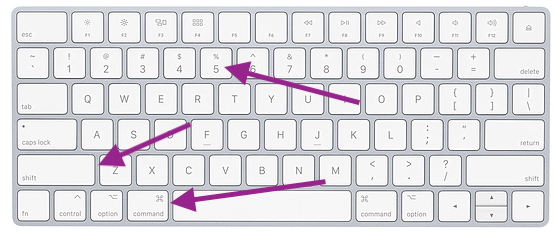
Simply press Shift-Command (⌘)-5 together.
 This will reveal the screenshot control menu. Your mouse pointer will turn into a camera icon. You will also see a screenshot control menu:
There are different screenshot options:
- Entire screen, your full screen
- Selected window, only selected window
- Selected portion
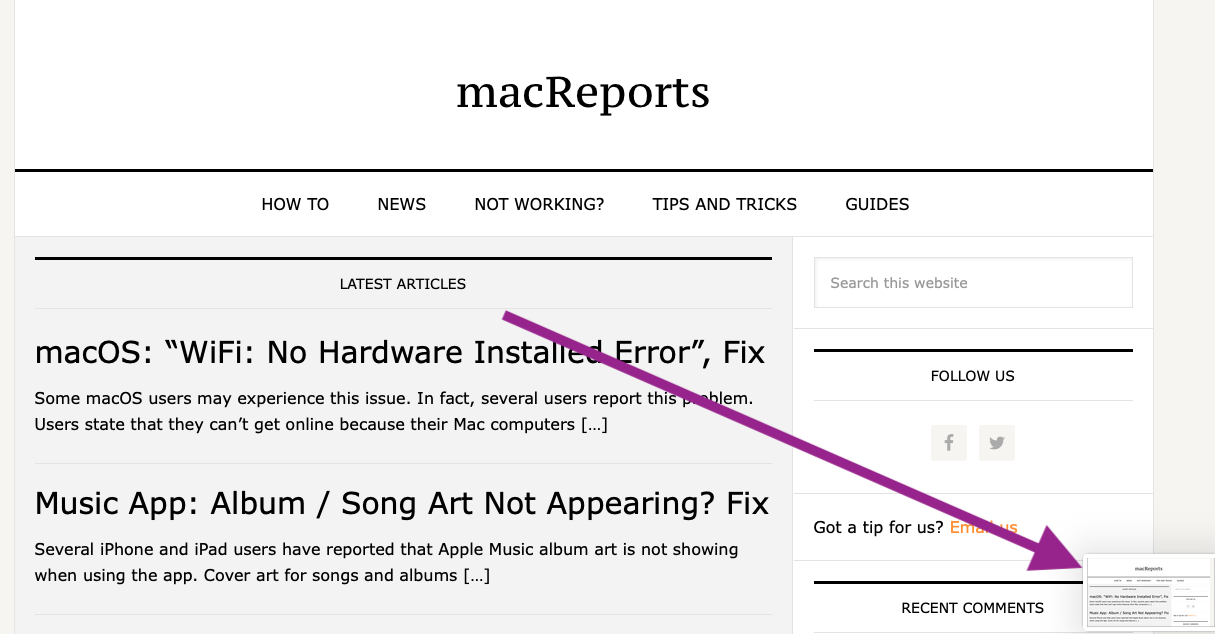
After taking your screenshot, a small image of it (its thumbnail) will appear in the lower-right corner of your screen for a few seconds:
If you take no action, the thumbnail will disappear and and your screenshot will be saved automatically. If you click the thumbnail, you can make small changes, like you can add texts, colors, shapes, signatures and more to your screenshots. You can also share your screenshot.
When you click Options, you can see many settings. You can change many options:
- You can change where you want to save your screenshots (e.g., Downloads, Desktop etc)
- You can use a timer (none, 5 seconds, 10 seconds)
- You can record your audio
- If you want to see the thumbnail once you take a screenshot
- and more
How to record a video of your screen
Screen recording can be used for many purposes. For instance you can create video tutorials. You can record your presentations etc. This is also called screen casting. When you click the Shift-Command (⌘)-5 keys, you will see that there are also different screen video recording options. This can be used to create video from your screen:
- Record entire screen
- Record selected portion
Just like the screenshots, when you record your screen, a thumbnail of the video will appear in the lower-right corner. When you click it, you can view your video and share it, if you like. However, your editing options are limited. You can only trim it. If you need further editing, you may want to use iMovie or something similar. Your videos will be saved as a .mov file.
You can video screen capture and audio recording. To do that, click Options, and select your microphone:

Screenshot shortcuts
You can also use the following the shortcuts to take your screenshots. These shortcuts work if you have Mac OS Mojave or Not.
- Shift-Command-3 > This will screenshot your whole screen. You will hear a quick camera sound. Your screenshots will appear on your desktop as a .png file.
- Shift-Command-4 > This will let you screenshot a part of the screen. Simply select an area. Again you can find your .png screenshot file on your desktop. You can use this shortcut to capture a menu image.
It is really easy to take a screenshot (print screen) on your Mac. You can open your images with other programs to edit them. For instance, you can use the Preview app. You can open the recordings in Quicktime or iMovie etc. Please also note that, unless you change it, your screenshots will be saved as “Screen Shot date at time.png” like: “Screen Shot 2018-12-27 at 7.22.28 PM.png”. And video recordings will be saved as “Screen Recording date at time.mov” like: “Screen Recording 2018-12-27 at 7.04.15 PM.mov”


hi – good article but one thing i cannot figure out, how do you stop a screen video recording session? i started one but couldn’t find any controls to stop. finally had to go back to quicktime where i knew how to stop it
Shift-Command-5 again and the menu bar will appear, at where you could stop the recording.