How To Recover Unsaved Word Docs – macOS
Are you writing a paper but you somehow lost the paper? Do you want to recover unsaved Microsoft Word files?
Microsft Word can create AutoRecover (.asd) files if this option is enabled (this feature is explained below). Because of various reasons (e.g. computer-system crash), AutoRecovery may fail to save your documents. For instance, if you experience a power loss while you are writing your paper on your Mac, or if your Mac shuts down, or crashes, unexpectedly, your document may be lost.
The purpose of the article is to help you if you are trying to locate your unsaved, lost, damaged and deleted Microsft Word files.
See also: Pages: Can’t Open Document
Here is how you can find them:
Locating Unsaved Word Document on Mac
Method 1: TEMP Folder
Mac OS creates temporary files located in your computer’s Temporary or TMP folder. Your lost file may be located in this folder. To find this folder;
1-Launch Terminal (Applications > Utilities > Terminal).
2-Enter this command and press enter:
open $TMPDIR
3-This will open your tmp folder.
4-Now, open the folder named: “Temporaryitems”. Your document may be here.
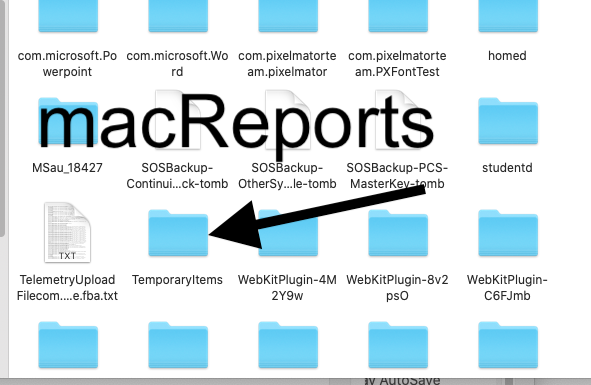
The files you find here will be a .tmp file. Look for files named “Word Work File” inside this folder. You can open them with TextEdit, for example. They are not .doc or .docx files.
Method 2: Look For AutoRecover files
You can locate your AutoRecover files (you can change where these files are saved, see below). Here is how:
1-Go to Finder > Go > Go to Folder and enter:
~/Library/Containers/com.microsoft.Word/Data/Library/Preferences/AutoRecovery

You may find your lost document here.
2-These documents’ names will be like “AutoRecovery save of <filename>”. Find the document that you are trying to recover. Please note that, as you may notice, they are not Word files. Find the document you want to open and right-click (or control-click) it and then select Open With > Microsoft Word.
Note that not all documents may be recoverable. Save your documents while editing to avoid losing data. You may also want to turn on AutoSave.
AutoRecovery Options:
You can change AutoRecovery options. There are basically two options for you to adjust:
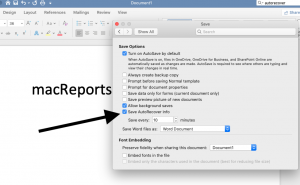
- You can change how often Word AutoRecovery creates these backup files. Open Word, and go to Word > Preferences > Save. Here you can change the AutoRecovery frequency settings:
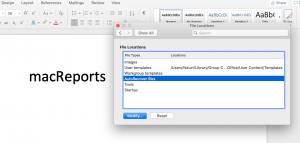
- In the other setting, you can adjust where these AutoRecovery files are saved on your Mac. Again, on your Mac, go to Word > Preferences > Personal Settings > File Locations > AutoRecover files > Modify and then choose your desired location.


Final Notes
See also: Outlook for Mac Not Working: Freezes or Crashes, Fix
You can reduce the risk of data loss in case of a crash, freeze or user error.
Microsft Word offers another very useful feature that will help you avoid losing data in the future. It is called AutoBackup. You can turn this on by going to Word > Preferences > Save and then check the”Always create backup copy” option.
As stated above, AutoRecover and AutoSave options are not the same things. AutoRecover may help you, for example, if Word or your Mac crashes. AutoSave, however, saves your Word documents automatically every few seconds.
See also: Mac White Screen: How To Fix Your Mac That Won’t Turn On


Thanks, that helped me track down a temporary copy that Word 365 (16.54 ) created when I hadn’t turned on AutoSave and my system rebooted …about 1/2 day’s worth of editing was saved!
WHOEVER YOU ARE, YOU ARE THE KING OR THE QUEEN! THANKS SO SO SOOOO MUCH FOR THIS!
Thank you :). I spent the whole day trying to find this document.
I lost my doc I had been working on for over an hour. I closed it and when asked to save I said no. I thought I wwas closing another doc I had open.I had auto save set on for every 10 minutes. I tried everything you suggested and nothing came up. HELP!
YOU ROCK! THANK YOU SOOOO MUCH!
I lost something on Microsoft literally the night it was due! The second option worked great!
THANK YOU SO MUCH! I will literally never us word again, Google docs autosave online.
THANK YOU SOOOOOOO MUCH just saved me over 10 hours of what was lost work!!!!! The AutoRecovery didn’t quite work but it got me to the containers–close enough–and I found it there!!! Seriously, thank you so very much for writing this article and sharing your knowledge.
or method 1 and 2 did not work for me. but before i lost my document it said it say i had no open a word doc i had just saved. it was on recently opened now it is gone
You are a god amongst us mere mortals. No other solution worked for me, and I had tried like 3 different file recovery programs. You saved my life
I LITERALLY OWE YOU MY LIFE. THANK YOU!!!!!
I have to say, I was nearly in tears when Word crashed & EVERY tutorial did not work. This is the only site that had Method 1 which worked perfectly! THANK YOU SO MUCH!
Thank you so muchhh!!!!!!
Thank you SO very much! Your Method 2 worked for me and saved me many hours of lost work. Thank you!!
Thank you thank you thank you thank you!!!! I lost 8 pages of work on an assignment that is due in a few days and nothing on Google was helping me, then I found this page! The ‘Look for AutoRecover files’ section is the one that worked for me. You’re a life saver 🙂
THANK YOU!