How to Format an External Hard Drive to Use with Mac
If you buy an external hard drive to use for backups, file transfers or extra storage, it will likely come formatted for use with Windows. This means you will probably need to reformat the drive before you use it with your Mac.
Although this should be a simple process, when you try to learn which file system is appropriate, you may be confronted with a list of possible file systems. In this article, we’ll help you choose which is right for you.
File systems compatible with macOS
There are a few, so we’ll first go through the list, telling you a little about each.
APFS
Apple File System (APFS) is the file system used for macOS 10.13 High Sierra (from 2017) and later. It has the following features:
- Encryption, space sharing, snapshots, fast directory sizing
- Optimized for Solid State Drive (SSD) but can be used with Hard Disk Drive (HDD)
The APFS options are APFS, APFS (Encrypted), APFS (Case-sensitive) and APFS (Case-sensitive, Encrypted).
Mac OS Extended
This is the file system used for macOS 10.12 Sierra (from 2016) or earlier. The options for Mac OS Extended are Mac OS Extended (Journaled), Mac OS Extended (Journaled, Encrypted), Mac OS Extended (Case-sensitive, Journaled) and Mac OS Extended (Case-sensitive, Journaled, Encrypted).
FAT
These are compatible with Windows. The options are MS-DOS (FAT) (also called FAT32), which is for volumes up to 32GB, and ExFAT, which is for volumes over 32GB.
Choosing your file system
If you don’t need to use the drive with Windows
- Choose APFS if you are running High Sierra or later. If you don’t know which macOS you are running, go to the Apple menu > About This Mac.
- Choose Mac OS Extended if you are running Sierra or earlier.
Case-sensitive and Encrypted
The question here is, should you use either one of these options? You probably don’t want or need case-sensitive. It seems that some software (like Adobe) will not run well on case-sensitive drives.
Should you encrypt the drive? This is a personal decision. If you encrypt the drive, you will need to enter a password in order to access the data on the drive. So, the usual recommendation may be to encrypt because it protects your data; however, if you feel that your data is not at risk, and especially if you worry about forgetting the password to your disk, you may choose not to encrypt.
If you need to also use the drive with Windows
If you have a smaller drive, such as a USB thumb drive (jump drive, flash drive, data stick, etc.), it may already be formatted in MS-DOS(FAT) or ExFAT. You can check the packaging or open Disk Utility to look at the formatting.
- Choose MS-DOS (FAT) for small drives (up to 32GB).
- Choose ExFAT for larger drives (over 32 GB).
How to format the drive
For Time Machine backups
If you will be using the drive for Time Machine backups, you can format the drive using Time Machine. When you open Time Machine and select the disk, it will walk you through the process. If you don’t want to use the entire disk for Time Machine backups, i.e., you want to be able to add some files manually, you will need to create another volume on the disk using Disk Utility first. You can also follow the instructions below to format the drive in Disk Utility and then set it up for Time Machine backups.
Formatting a drive in Disk Utility
Before you begin, if there are any files you want to keep on the drive, you need to save them somewhere else before reformatting.
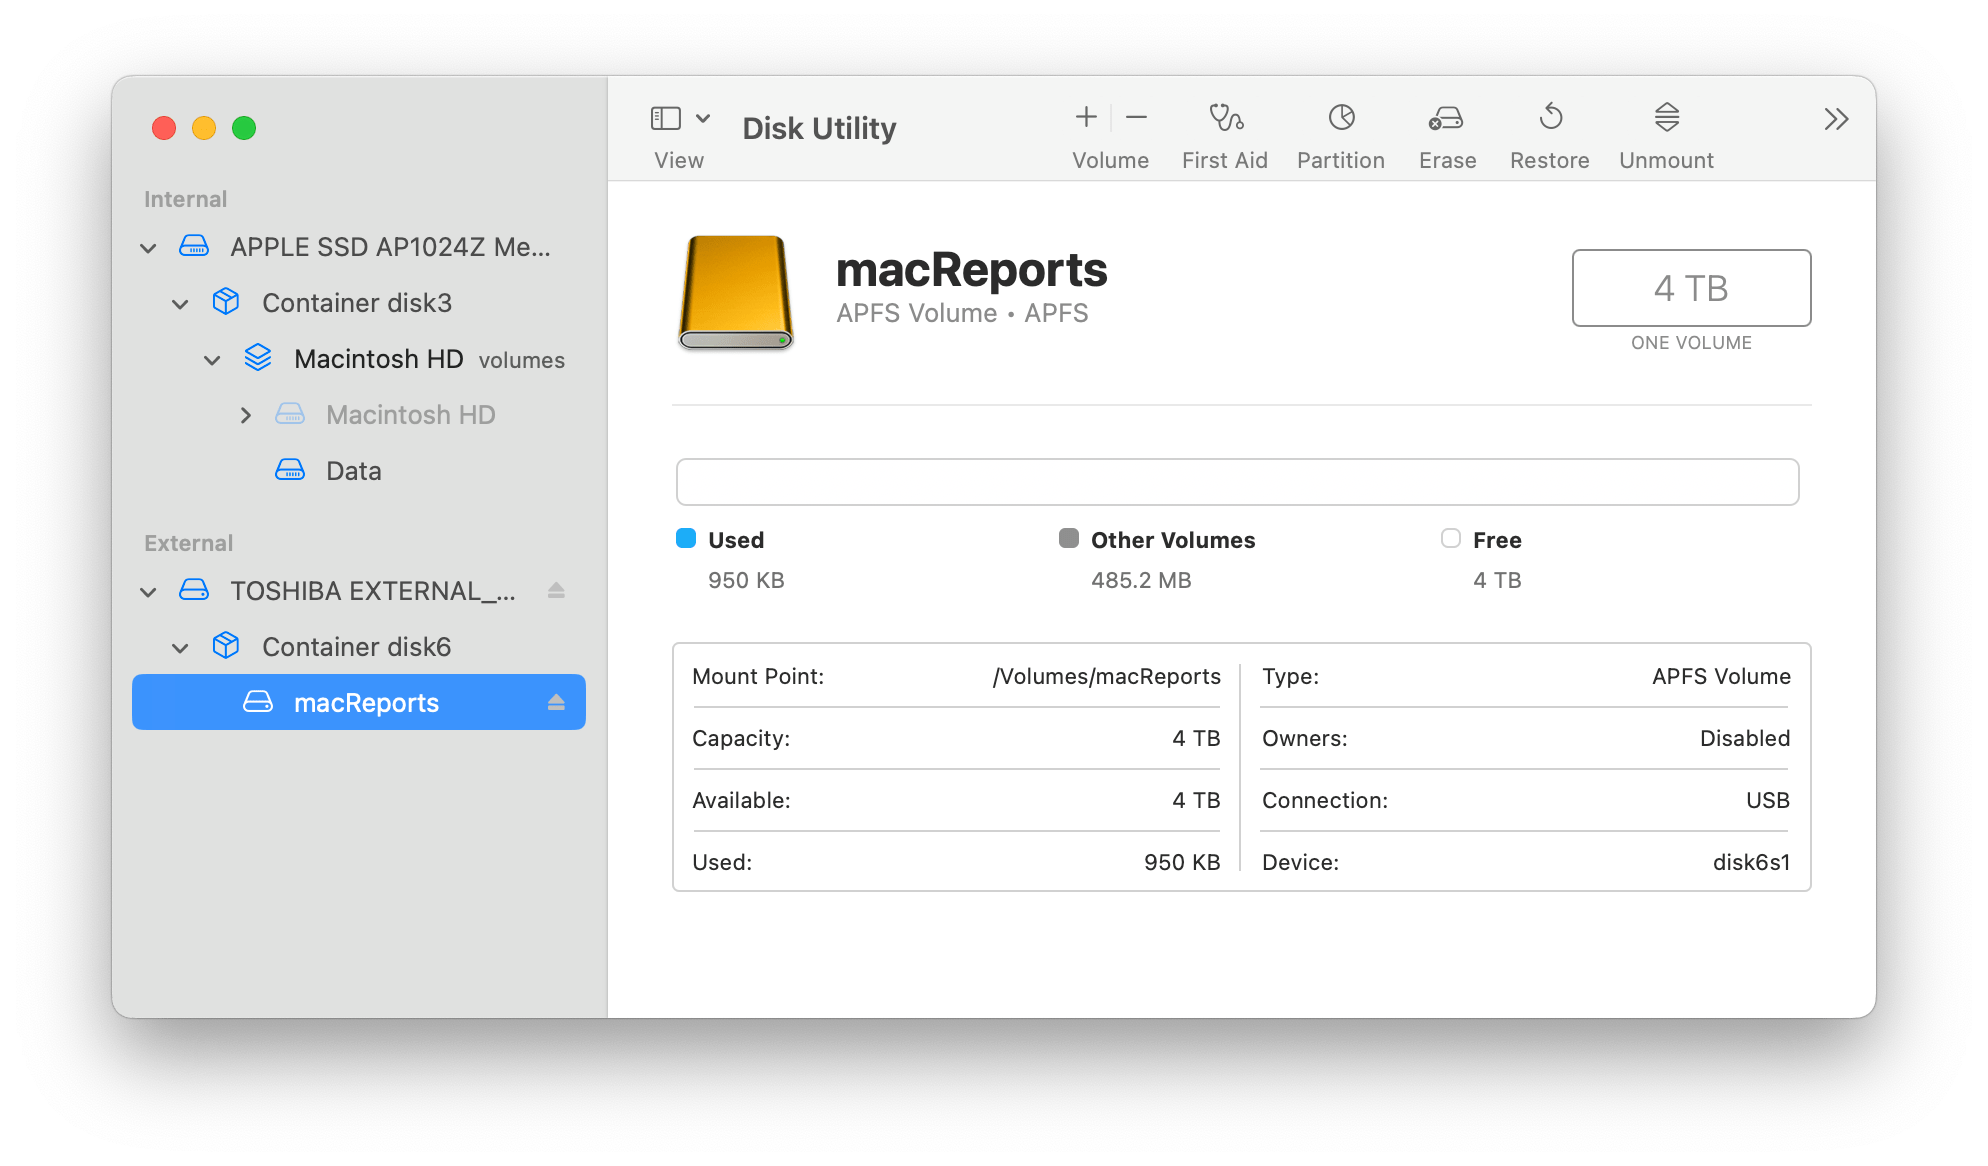
- Connect the drive to your Mac, then open Disk Utility. You can press Command–Space bar and type disk utility or go to Applications > Utilities in Finder.
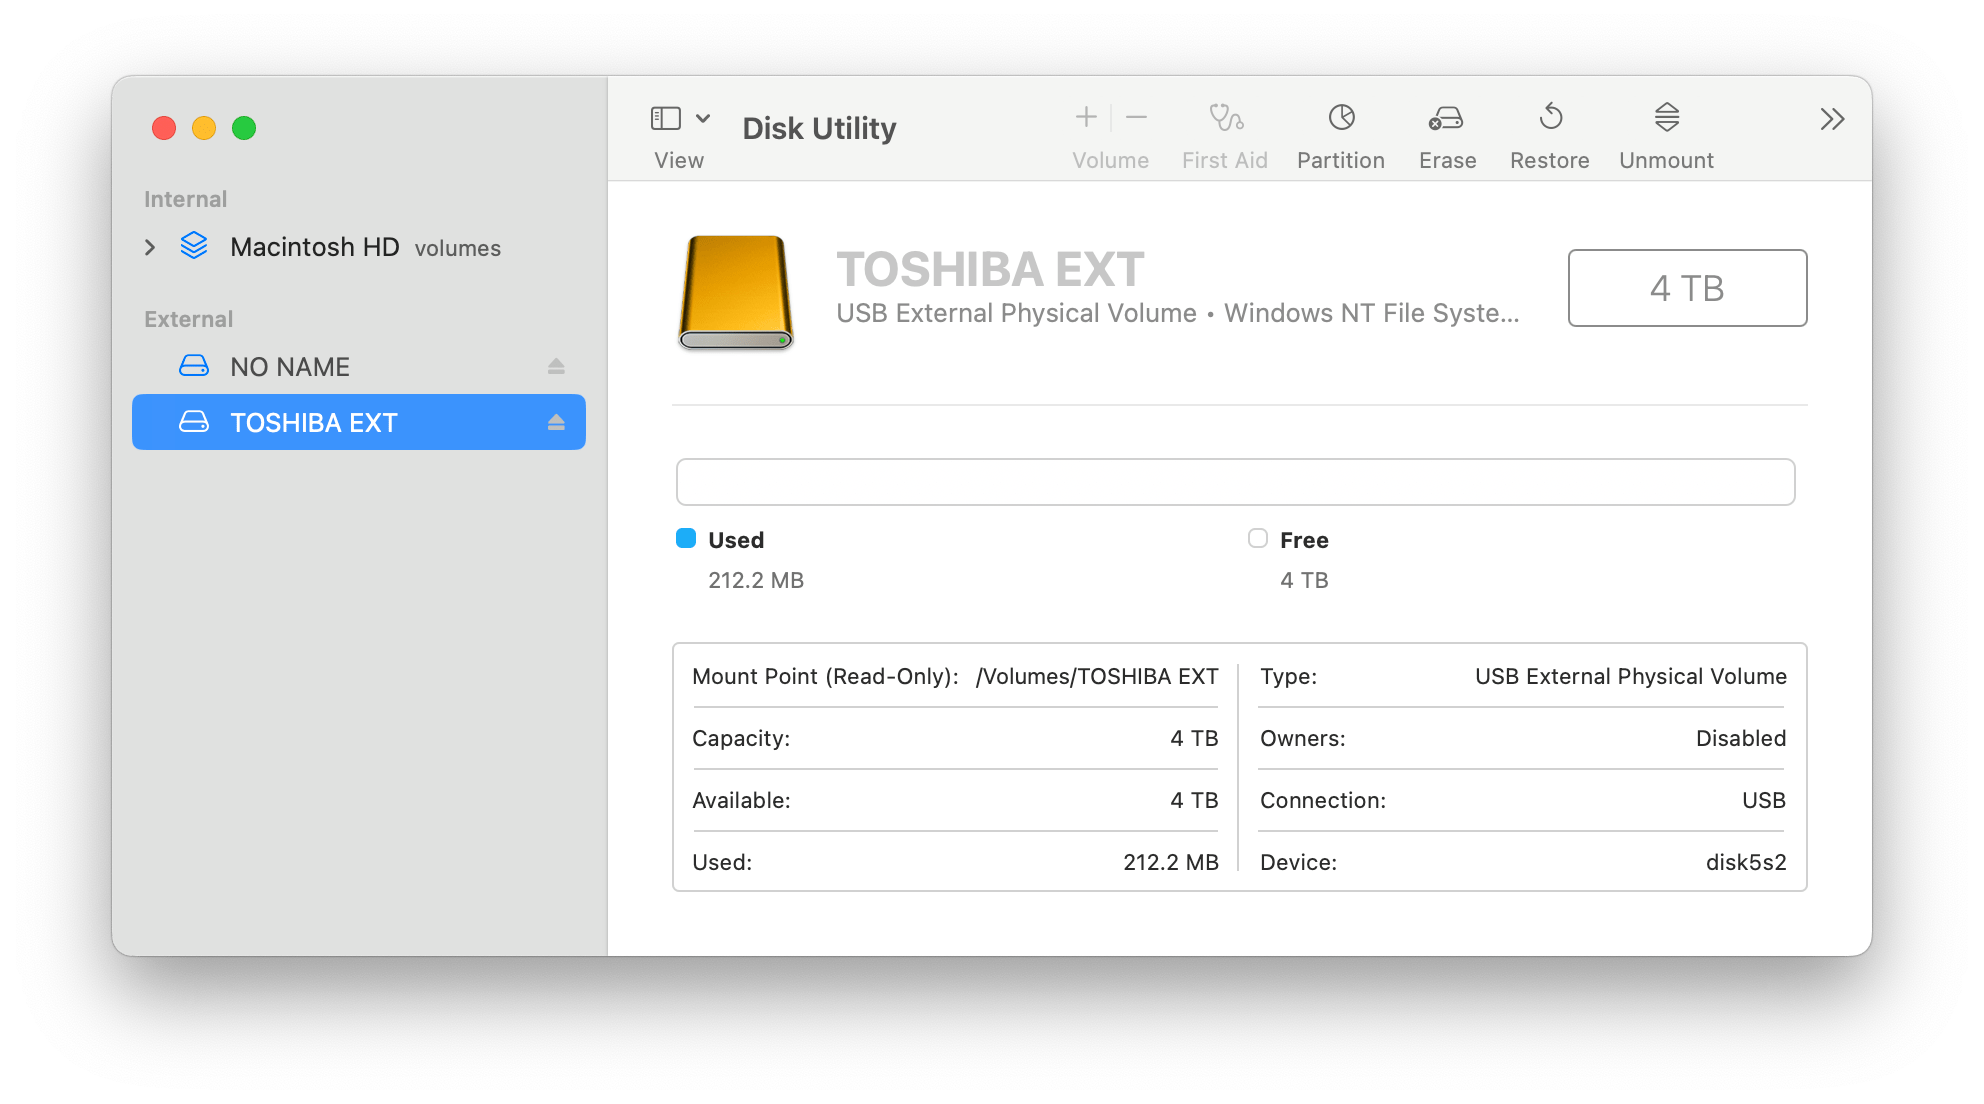
- Find your drive in the left sidebar under External and select it.
- In the main part of the window, under the name of the drive, you will see its current format.
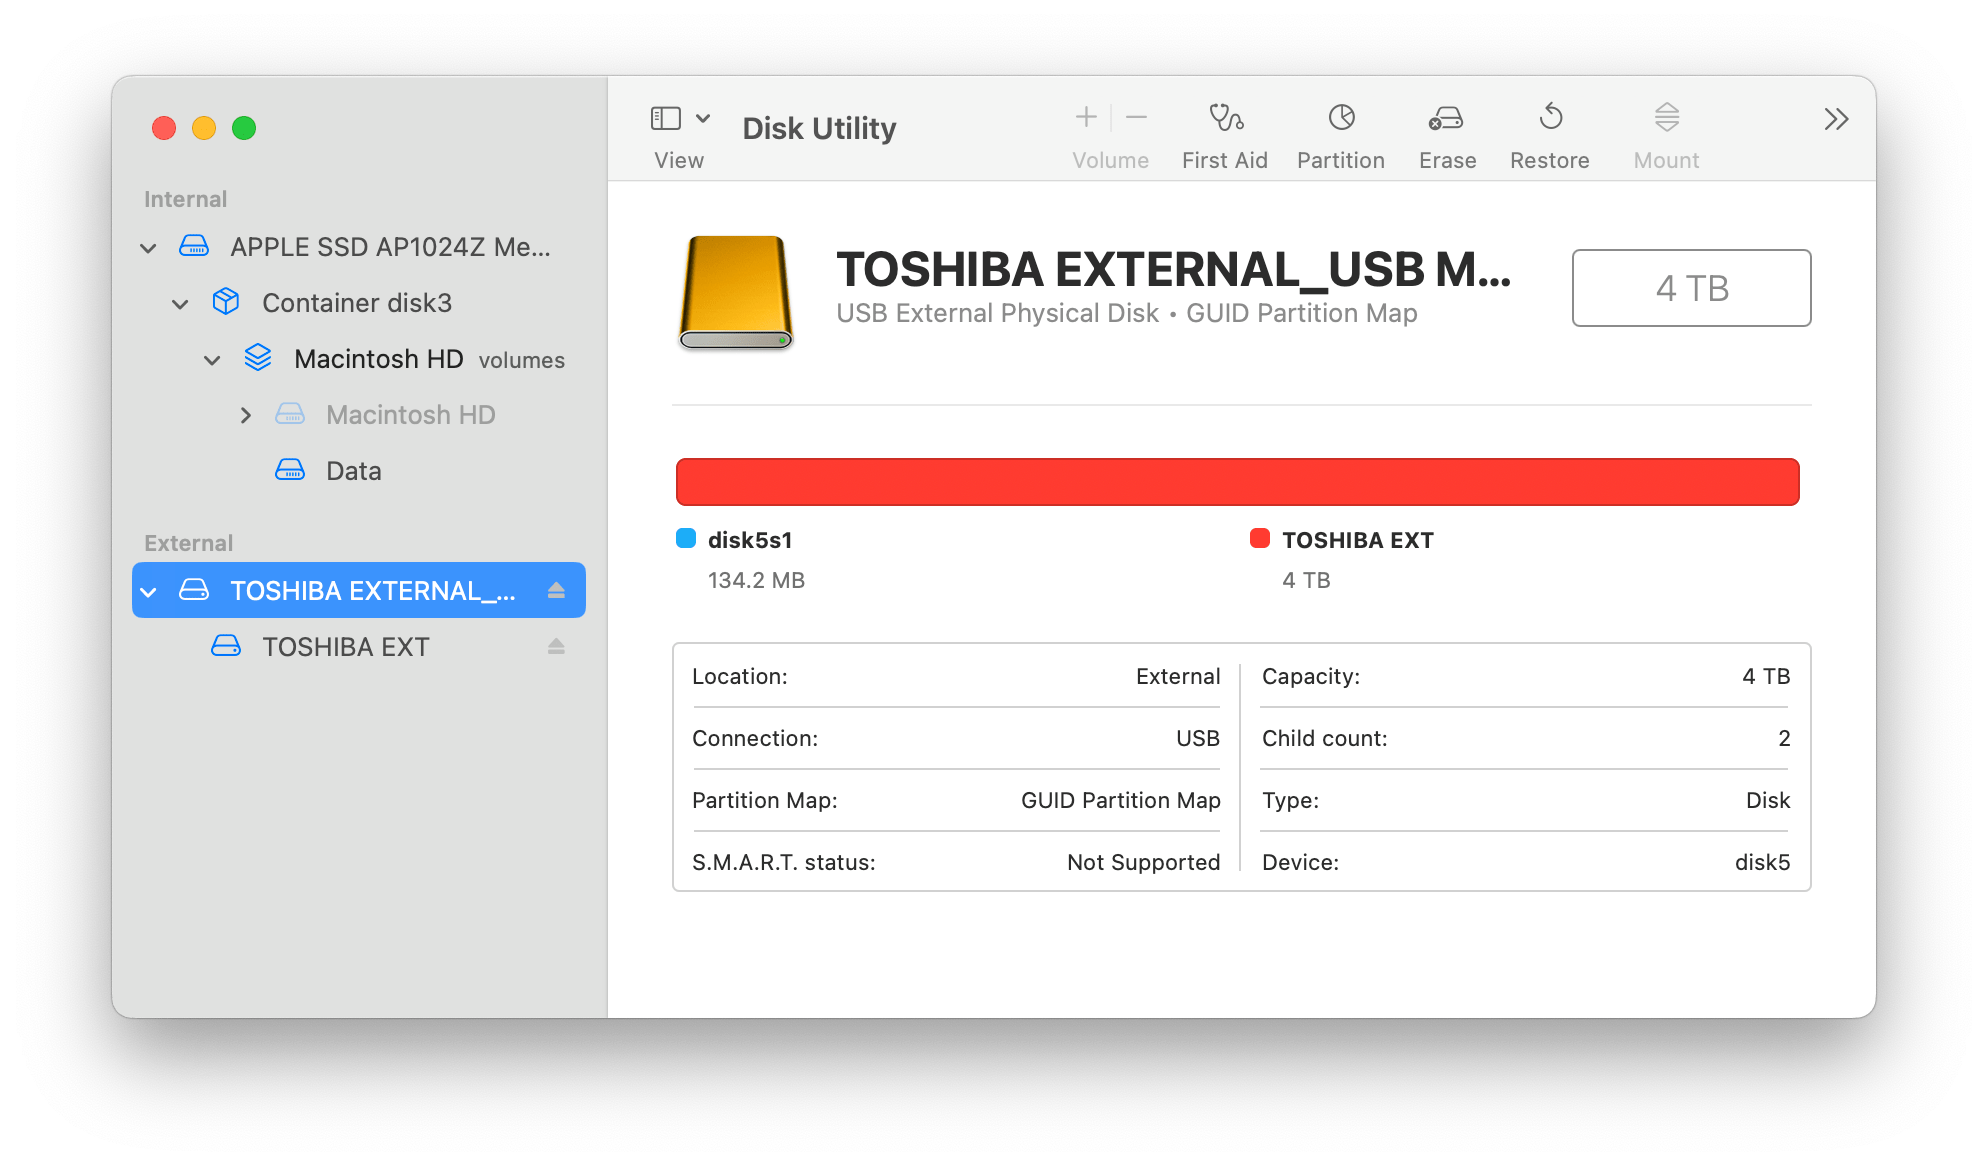
- Click on the View button in the Disk Utility toolbar and select Show All Devices.
- Select your external storage device in the sidebar. Select the actual device, which will be the highest level, above all of the volumes for that device. For example, in the image, you will see my device, TOSHIBA EXTERNAL. Underneath is listed the only volume on that device, TOSHIBA EXT. I want to choose TOSHIBA EXTERNAL.
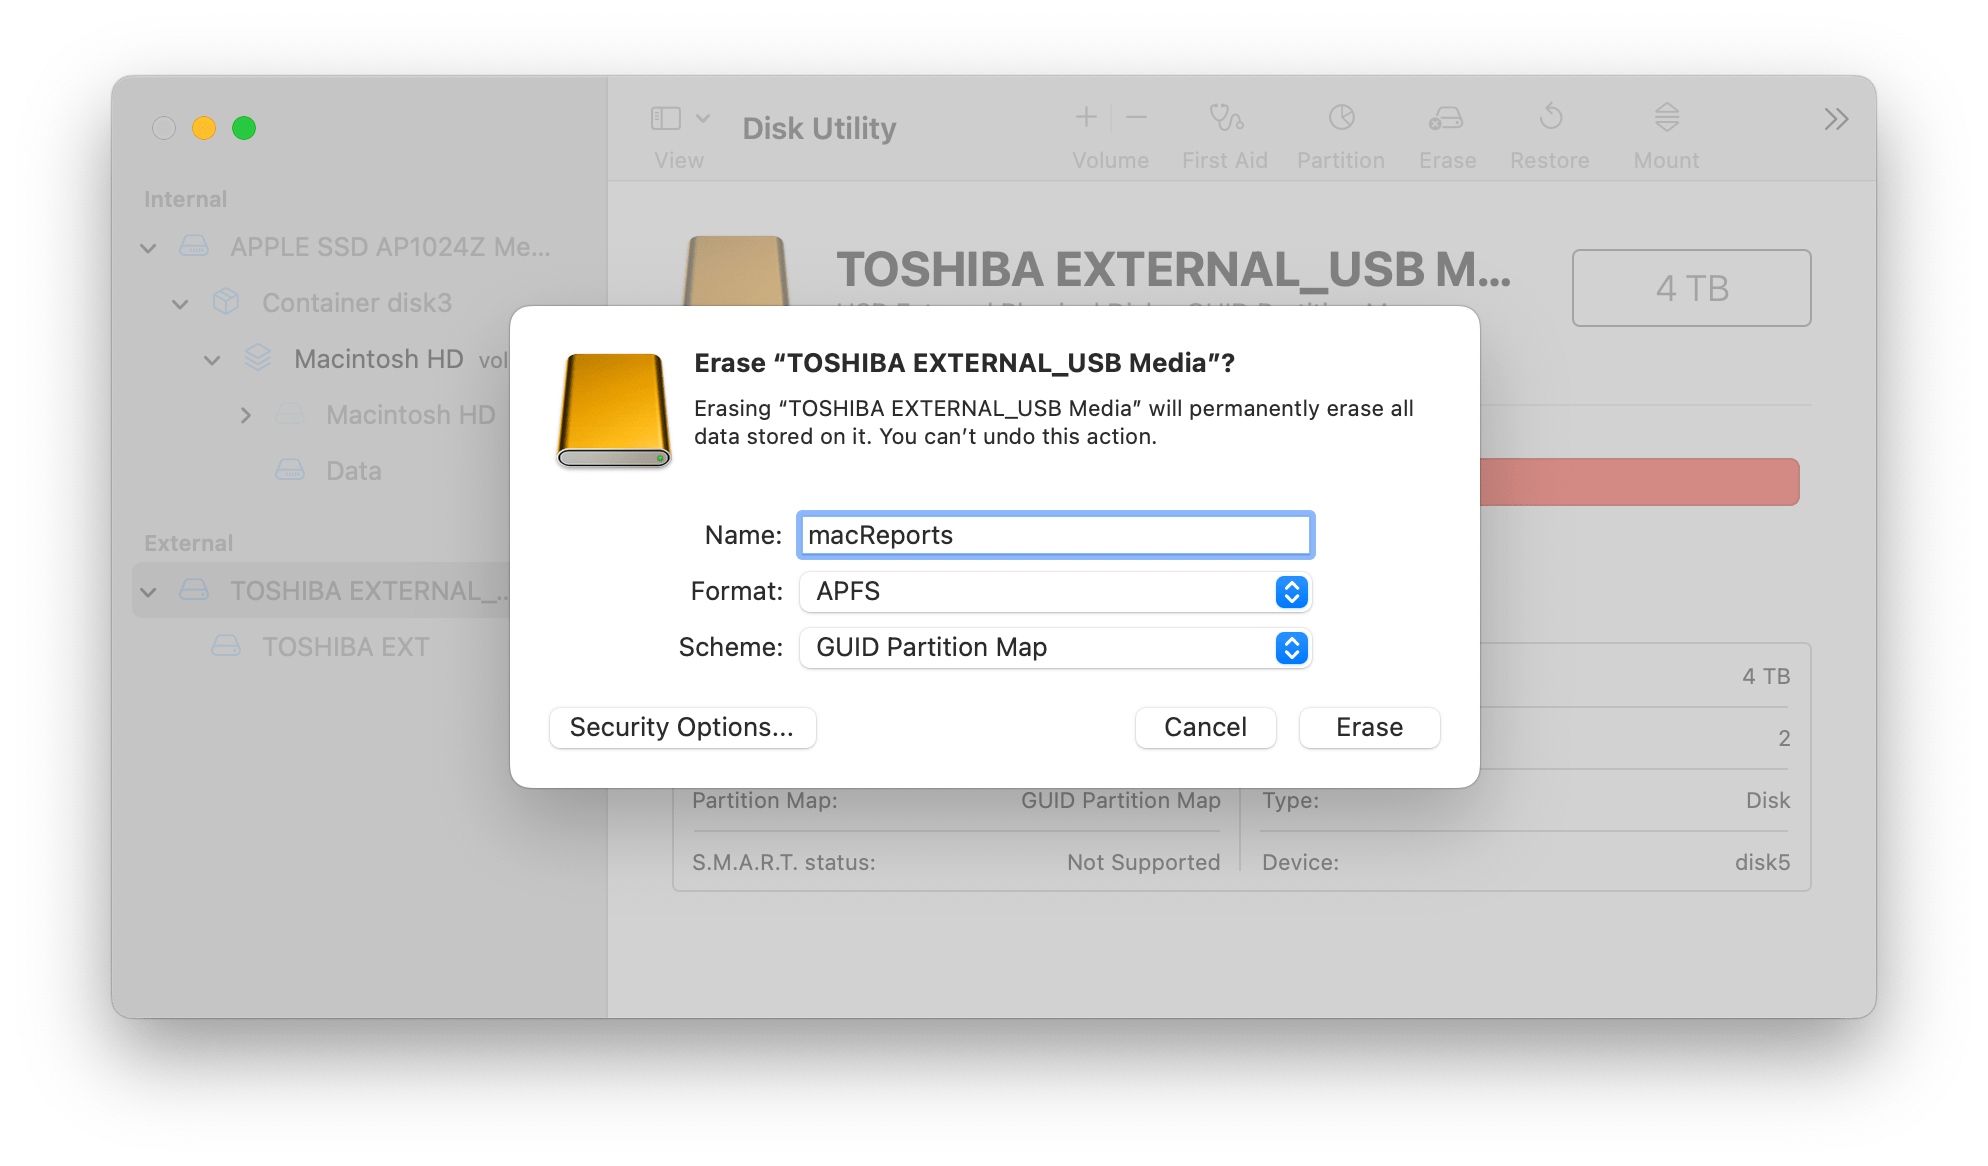
- Click on the Erase button in the toolbar. A popup window will appear, and you will see a warning that all data on the drive will be erased.
- Give your volume a name, choose the format and keep GUID Partition Map as the Scheme. Then, click Erase.
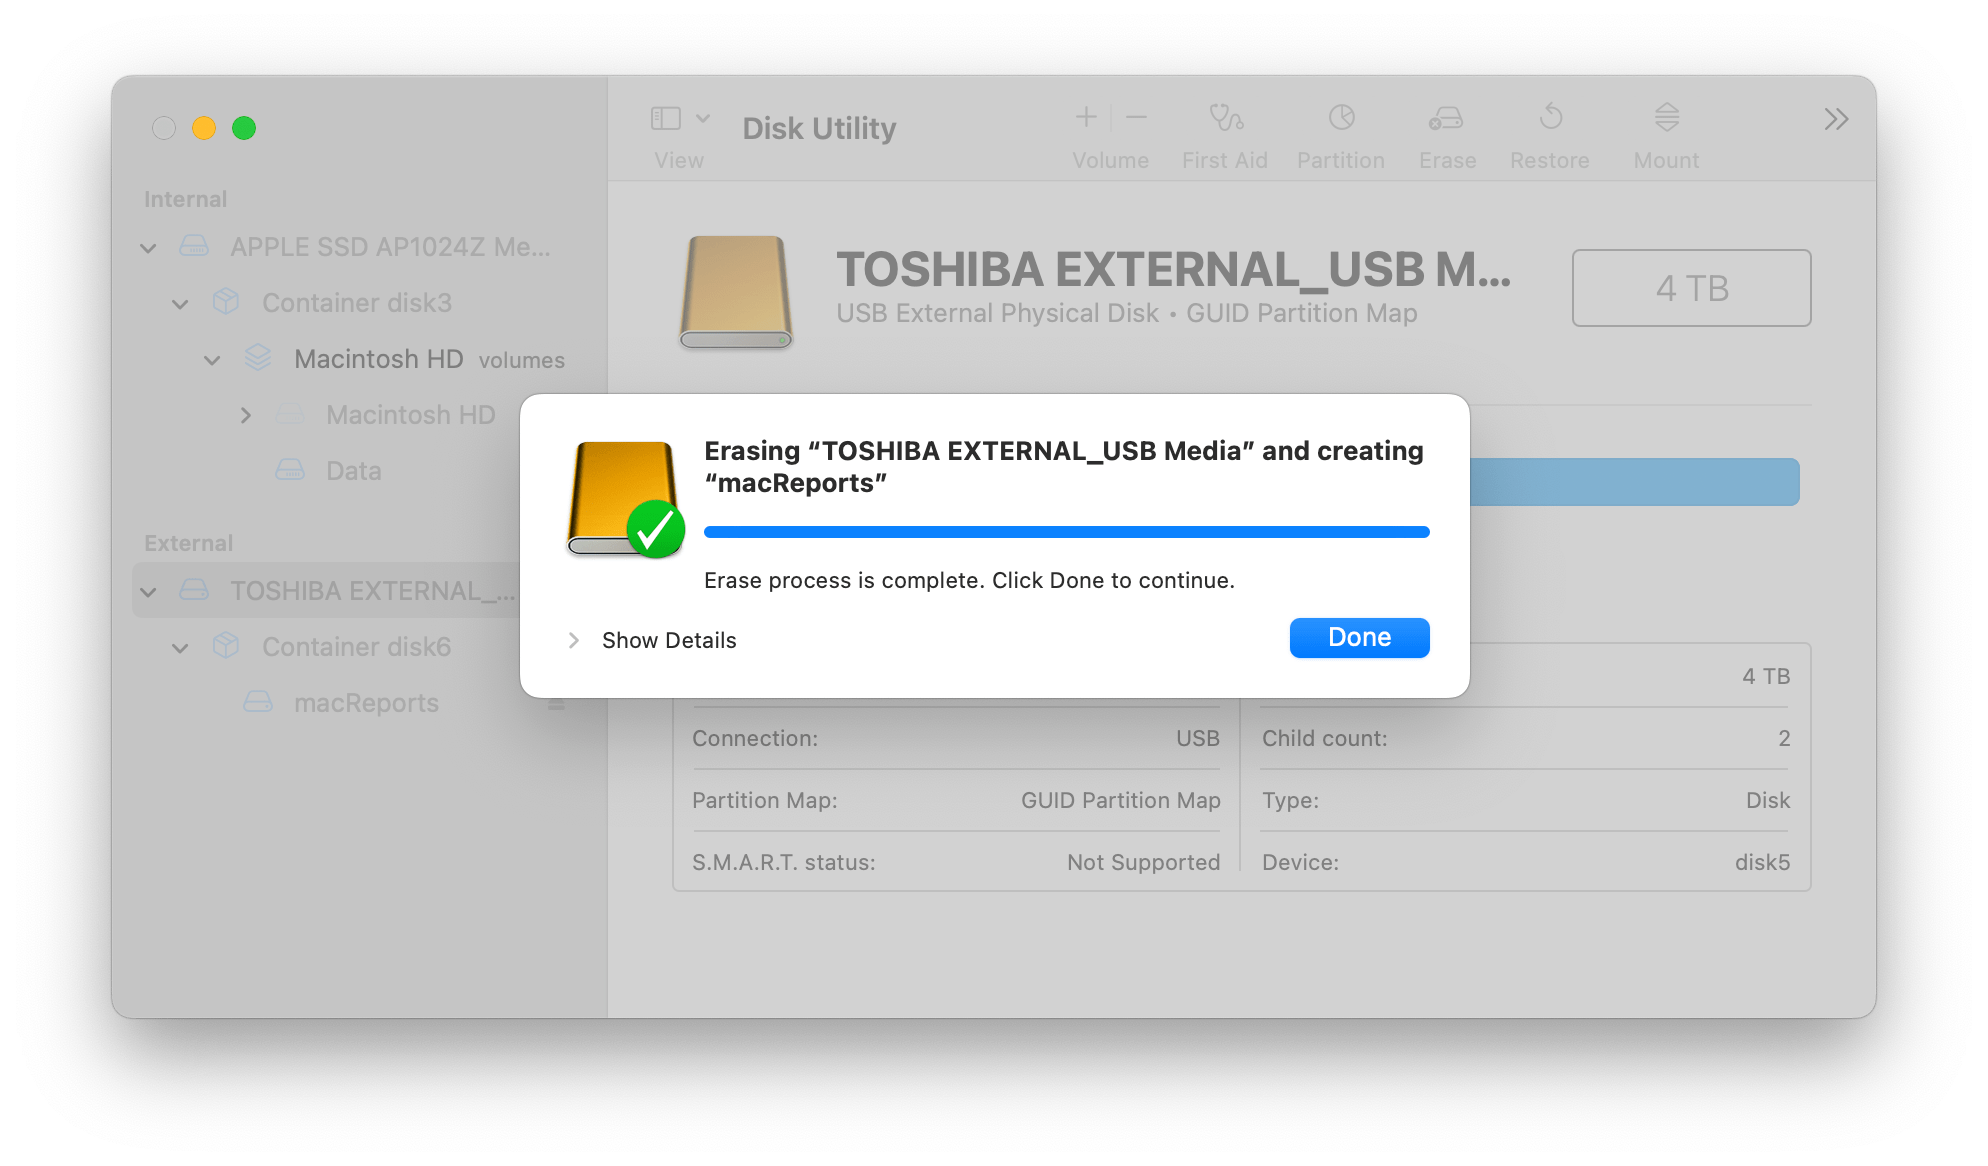
- The popup will show the progress. When it has finished, click Done.
- Now you can see the changes. Your new volume should appear, with the name you gave it, underneath the device name. You’ll see that it has your chosen format.
Time Machine Notification after formatting in Disk Utility
After Disk Utility finished formatting my drive, I got a popup about using the drive for Time Machine backups. Now, I am actually going to use my drive for Time Machine backups, so I clicked Options, then Set Up on the notification. System Settings opened with a popup window showing options to encrypt the backup and limit disk usage. After I chose my options, I clicked Done. My first backup began one minute later.
If you have chosen to use your drive for Time Machine, you can change your Time Machine settings by opening System Settings > General > Time Machine.
If you have more questions about Disk Utility, see the following documentation:
Related articles
- Boot Camp Error “The Startup Disk Cannot Be Partitioned Or Restored To A Single Partition”
- Storage System Verify or Repair Failed, How to Fix
- The Disk “Macintosh HD – Data” Can’t be Unlocked, Fix
- How To Restore Your Mac To Factory Settings
- What is FileVault and How to Turn It On and Off
- How To Reinstall Mac OS on Your Mac

