Mac Ethernet Not Working? How to Fix
This article explains how you can troubleshoot when your wired ethernet connection is not working on your Mac. Sometimes you may experience that your Wi-Fi connection is working properly, but still, you may not connect your Mac to the internet using Ethernet. Likewise, you may experience that your Mac’s Ethernet ports may not be working and you may see that network status is saying “Cable Unplugged” while it is connected.
On your Mac, you can use a wired connection, instead of Wi-Fi, by connecting your Ethernet cable between your router or modem and the Ethernet port (or your Ethernet adapter if your Mac does not have this port).
If you are having this problem, try the steps below in order until you have fixed your issue.
Make sure that your Mac has the latest version of macOS. You can check for updates by going to System Preferences > Software Update. And if there is an update, follow the onscreen instructions to update your Mac.
Ethernet problems on Mac
1. Make sure that your Ethernet cable is working and not damaged. Check your cable for signs of damage. Use a different cable if possible.
Furthermore, please ensure that you check for firm, proper connections between your computer and the ethernet device. Disconnect the cable and then reconnect. You can also try plugging the ethernet cable into a different port.
2. Restart Ethernet using Terminal.
You can restart your Mac’s network interface using Terminal. Here is how:
- Open Terminal (Applications > Utilities).
- Enter the following command and press enter:
sudo ifconfig en0 down
- Enter your password if asked.
- Then enter the following command and hit enter:
sudo ifconfig en0 up
And then test to see if Ethernet is now working.
Note: en0 is the name of wireless interface. It could be en1 etc.
3. Restart everything in this order:
- Turn off your Mac (Apple menu > Restart).
- Turn off your ethernet device like your modem. You can do so by unplugging the power cord.
- Wait 30 seconds.
- Turn on your ethernet device by plugging the power cord back in.
- Wait for your ethernet device to turn on fully. Make sure all of its lights are on.
- Turn on your Mac.
4. Ensure that your settings are correct. On your Mac, go to the Apple menu > System Preferences > Network. You will see, on the left, a list of network services. Select Ethernet. If you are not sure about how to configure these settings, contact your service provider. For example, some service providers use DHCP while others may use BootP.
5. Restart your Mac in Safe Mode. Please follow the steps below:
Intel based Mac:
- Turn off your Mac (Apple menu > Restart). And wait for your Mac to turn off completely.
- Turn on your Mac and immediately press and hold the Shift key.
- Keep holding the Shift key until the login screen appears.
- Login.
Apple silicon
- Turn off your Mac.
- Press and hold the power button until the startup windows option appears.
- Select your startup disk.
- Press and hold the Shift key and click Continue in Safe Mode then you can release the Shift key.
- Login.
Now test your ethernet problem in Safe Mode. Does it work? Leave Safe Mode and then test again.
6. Delete the Ethernet service and then re-add. Here is how:
- Make sure that your ethernet cable is connected.
- Then, on your Mac, go to System Preferences > Network.
- You will see a lit of services: Wi-Fi, Bluetooth PAN, Ethernet etc. Select Ethernet.
- Click the remove (-, minus) button at the bottom of the list at the left.
- This will remove Ethernet, click Apply.
- Now select Bluetooth PAN and then click the Advanced button.
- Then click the DHCP Lease button. Click OK and Apply.
- Then restart your Mac (Apple menu > Restart).
- Now again go to System Preferences > Network.
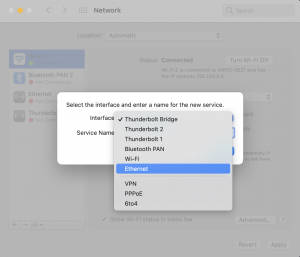
- Click the add (+) button and a popup will appear. Open the Interface dropdown menu and select Ethernet and then click Create and Apply.
- Wait for your Mac to automatically connect to the internet.
If you are still having this problem, contact Apple. Apple offers many support options including live-chat.
See also:


