My Mac Stopped Seeing My Wi-Fi Network, Fix
I recently started experiencing this problem. My Mac suddenly stopped seeing my Wi-Fi network, even though my other devices were able to connect to the same Wi-Fi network. In other words, my Wi-Fi network was not showing up in my list of available networks on my Mac. However, I was seeing other nearby Wi-Fi networks such as my neighbors’ wireless networks.
Wireless network names are broadcast so that you can know which one to join.
You can see nearby wireless networks by clicking the Wi-Fi icon in the menu bar on your Mac. The Wi-Fi network names (also called SSIDs) will appear when looking for a Wi-Fi network to join unless it is a hidden network. This article explains how you can fix it if you cannot see your network listed. This is an important problem. This will prevent you from connecting to the Internet over Wi-Fi if your Mac cannot find your Wi-Fi network.
Before you do anything, please ensure that your router is turned on and you are not too far from your Wi-Fi router so that your Mac can get strong signals from it.
Please try the steps below. After trying each step below, try to connect again to see if you’ve fixed your issue.
Related articles:
- Mac Wi-Fi Connected But No Internet Access
- How To Turn On And Use Wi-Fi Calling On Your Mac
- How To Fix Slow Wi-Fi Problems On Your Macbook
- How To Disable Wi-Fi Auto-Join in macOS
- How To Reset Network Settings On Mac
- macOS: “WiFi: No Hardware Installed Error”, Fix
1. Restart your Mac and router
Simply restart your Mac and Wi-Fi router. This may help you fix your problem:
- Mac: You can restart your Mac by choosing Restart from the Apple menu.
- Router: unplug the power, wait 10 seconds, and then replug. Wait at least two minutes to allow the router to fully turn on.
You may also want to reset your router to its factory default settings. Doing so will wipe out all of your settings. You can start over with fresh settings. Most routers include a reset button (on the back or bottom). You will need to insert a paperclip (or something similar) to push this button. Insert your paperclip and hold down for 30 seconds. Then wait for your router to turn on.
2. Wireless Diagnostics
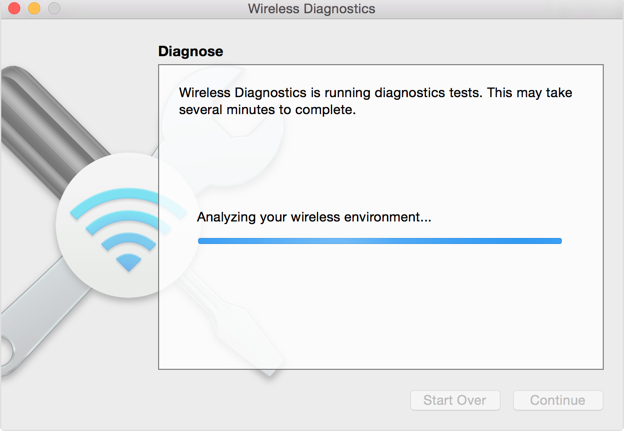
Your Mac offers a feature called Wireless Diagnostics. Use this to troubleshoot your problem. This tool will analyze your Wi-Fi network. Here is how:
- On your keyboard, press and hold the Option (alt) key.
- While pressing the Option key, click the Wi-Fi icon in the menu bar.
- A menu will be opened (that usually displays the nearby Wi-Fi networks).
- Click Open Wireless Diagnostics. If asked, enter your passcode.
- Click Continue. And then follow the onscreen instructions. For me, running this was enough to fix this problem.
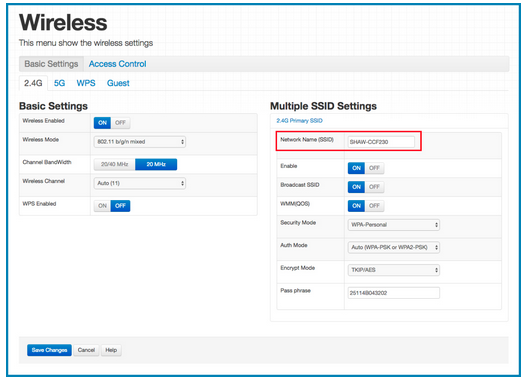
3. Change your Wi-Fi name
Some users have said that changing the Wi-Fi name (also known as SSID, or Service Set Identifier) fixed this problem.
- Log in to the router’s administrative console. You can do this via a web browser. Routers have a local IP address to access the admin panel. for example:
- AT&T routers use 192.168.1.254.
- Linksys routers use 192.168.1.1.
- Netgear routers use http://www.routerlogin.net.
- Some routers use 192.168.0.1.
- BlueCurve Gateway uses 10.0.0.1.
- Simply type these IP addresses or the URL into your browser’s address bar and hit enter. This will open a login window. You may have to check the documentation or website of other router manufacturers to find out the local address and login details. These details are usually printed on a sticker on your modem.
- Click Wireless and change the Wi-Fi Name (SSID) name.
4. Forget your Wi-Fi network
This involves deleting your wireless profile in macOS. When you follow the steps below, your Mac will forget the Wi-Fi network and its password. Here is how you can do this on your Mac:
- Open System Preferences on your Mac.
- Click Network.
- From the left menu, click Wi-Fi and click the Advanced button.
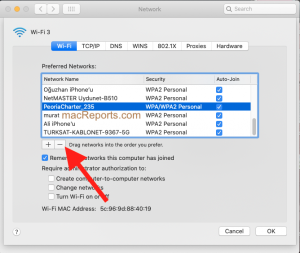
- You will see a Preferred Networks list.
- Select the Wi-Fi network that you are unable to join.
- Then click the (-) remove button.
- A popup will appear, click again Remove.
- Then click OK and Apply.
5. Reset PRAM or NVRAM
Resetting PRAM or NVRAM may fix this problem. PRAM or NVRAM are different things, but they are reset in the same way. Here is how:
- Turn off your Mac.
- Locate these four keys and do not press them yet: Option, Command, P, and R.
- Turn on your Mac and immediately press and hold these keys.
- Keep holding them for 20 seconds. Then release them. This will reset PRAM or NVRAM. This will reset some of your settings such as display, volume, time zone, etc. Open System Preferences and adjust your settings.
If resetting PRAM or NVRAM does not help, you may want to reset the SMC.
I did all the troubleshooting from removing anti-virus, trying another user profile, using Terminal to turn the WiFi interface on and to generate a System Diagnosis Report. I also tried reinstalling OS 10.11 (older iMac I keep around for 32-bit apps).
Here’s where things got strange: Disk Utility doesn’t report any issues with the disk and WiFi works fine in Safe Mode — so the best option seemed to be the SMU and PRAM/VRAM reset. I am not convinced the SMU was successful. The VRAM only worked through the Terminal. When it came to zap the PRAM — something I have been doing successfully since I bought my first Mac in the 1990s — it wouldn’t work. I tried swapping the BT Apple Keyboard for a newer Apple Keyboard and still the same result.
I ran Apple Hardware Diagnostics (extended) and only found an issue with an HD fan. So what does it mean when the Mac absolutely refuses to allow me to zap the PRAM?
I have an earlier macOS running on another partition with no WiFi issues. What’s strange is that El Capitan and the WiFi were getting along just fine for years and now I can’t get the WiFi interface to switch on no matter what I do. The only thing I got from Wireless Diagnostics was some crash logs pertaining to Microsoft Updater and WiFi Proxy (but no Proxy is checked in the System Preferences).
I think I have read about 50 different web forums and articles on the subject of troubleshooting a WiFi interface that won’t turn on, and one thing I get repeatedly (from the comment section) is that those who are having WiFi disconnects seem to have more success whereas those who are not able to SEE any wireless networks don’t always see their problem resolved apart from downgrading their OS. What I don’t get is how El Capitan managed to work just fine with the same wireless network settings for so long, and then one day “Poof!” it’s gone? Everything I have read suggests that if it works in Safe Mode it should be possible to get it up and running again. But unless Microsoft Updater is to blame (or WiFi Proxy even though I don’t have any of those options checked?), I’m clean out of suspects.