‘macOS Ventura’ Could Not Be Verified, How to Fix
Updating your Mac is usually straightforward and smooth. Your Mac tells you there is an update, and you just click a few buttons, and it is done in a few minutes (or longer for bigger upgrades). However, in some cases, issues may also occur. These problems are usually easy to fix.
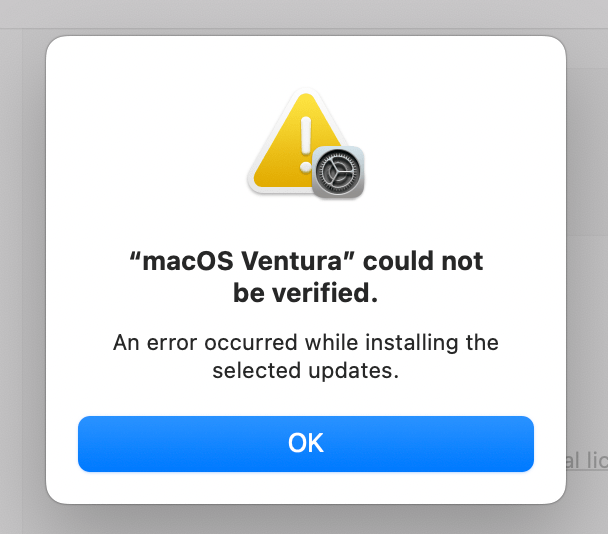
I recently updated my Mac to the latest version of macOS Ventura. While I was trying to install the update, I had this problem saying, “macOS Ventura could not be verified. An error occurred while installing the selected updates” with an OK button. In this article, I explain how I fixed this problem. If you are having the same problem, you can try the steps below.
- This issue may occur if the macOS Software Update service is experiencing outages. Simply go to the System Status page and check this. If this is the problem, wait and then try again when Apple fixes the issue. Sometimes, Apple’s servers may be overloaded, causing these types of issues. You will see a notification if there are issues on Apple’s end. If that is the case, the only thing you can do is wait for Apple to fix it. The system status page will be updated once the issue is addressed.
- I had this problem after downloading the update. If you run into this error message after the download, do not download the update again. Simply open Launchpad on your Mac, and you will see that macOS Ventura is also listed there. Click on it to initiate the install. This time you may successfully install it.
- This issue may also occur if the Date and Time settings on your Mac are not accurate. On your Mac, go to System Preferences > Date & Time. Click Click Date & Time and turn on the Set time and date automatically option, then click Time Zone and enable the Set time zone automatically using current location option. You may need to unblock the section before you can make changes. After these changes, restart your Mac and then go to System Preferences > Software Update and try to update again.
- Check your connection. Is your Internet connection stable? Try restarting your router/modem. Also, try disabling any VPN service you may be using. Then try to update again.
- Some of the third-party apps may be interfering with the Ventura update. You can bypass this by trying to update in Safe Mode. Simply restart your Mac in Safe Mode, then go to System Preferences > Software Update and try again in Safe Mode. If you can install in Safe Mode, then exit Safe Mode by restarting your Mac.
Related articles

Thanks a lot for this article. It helped me fix the issue and it’s now working smoothly. I’ve been looking up other articles on fixing my Macbook Pro 2017 not updating to Ventura from Catalina but they haven’t really been detailed and as easy to get as this. Thanks again.