Is System Data Taking Up 50, 100 GB or More Storage on Mac? Learn Why and How to Clear It
When Mac users check their Mac’s storage, they are sometimes shocked to find that System Data (System, macOS, Other) is taking up a huge amount of their storage, like 100s of GBs or sometimes more than 1 TB. For most users, this is a complete mystery. They wonder:
- What exactly is in System Data (or System, macOS, Other)?
- Why is it taking up so much space?
- How can I reduce the size of System Data? Can I delete it?
This storage issue can be a problem when more space is needed. Affected users may run into a problem where they don’t have enough free space to update their Mac. In this article, we’ll tell you how to clear some of this System storage.
What is System Data in macOS?
What is currently called System Data in macOS Ventura has previously been called Other, System or macOS in other versions of macOS.
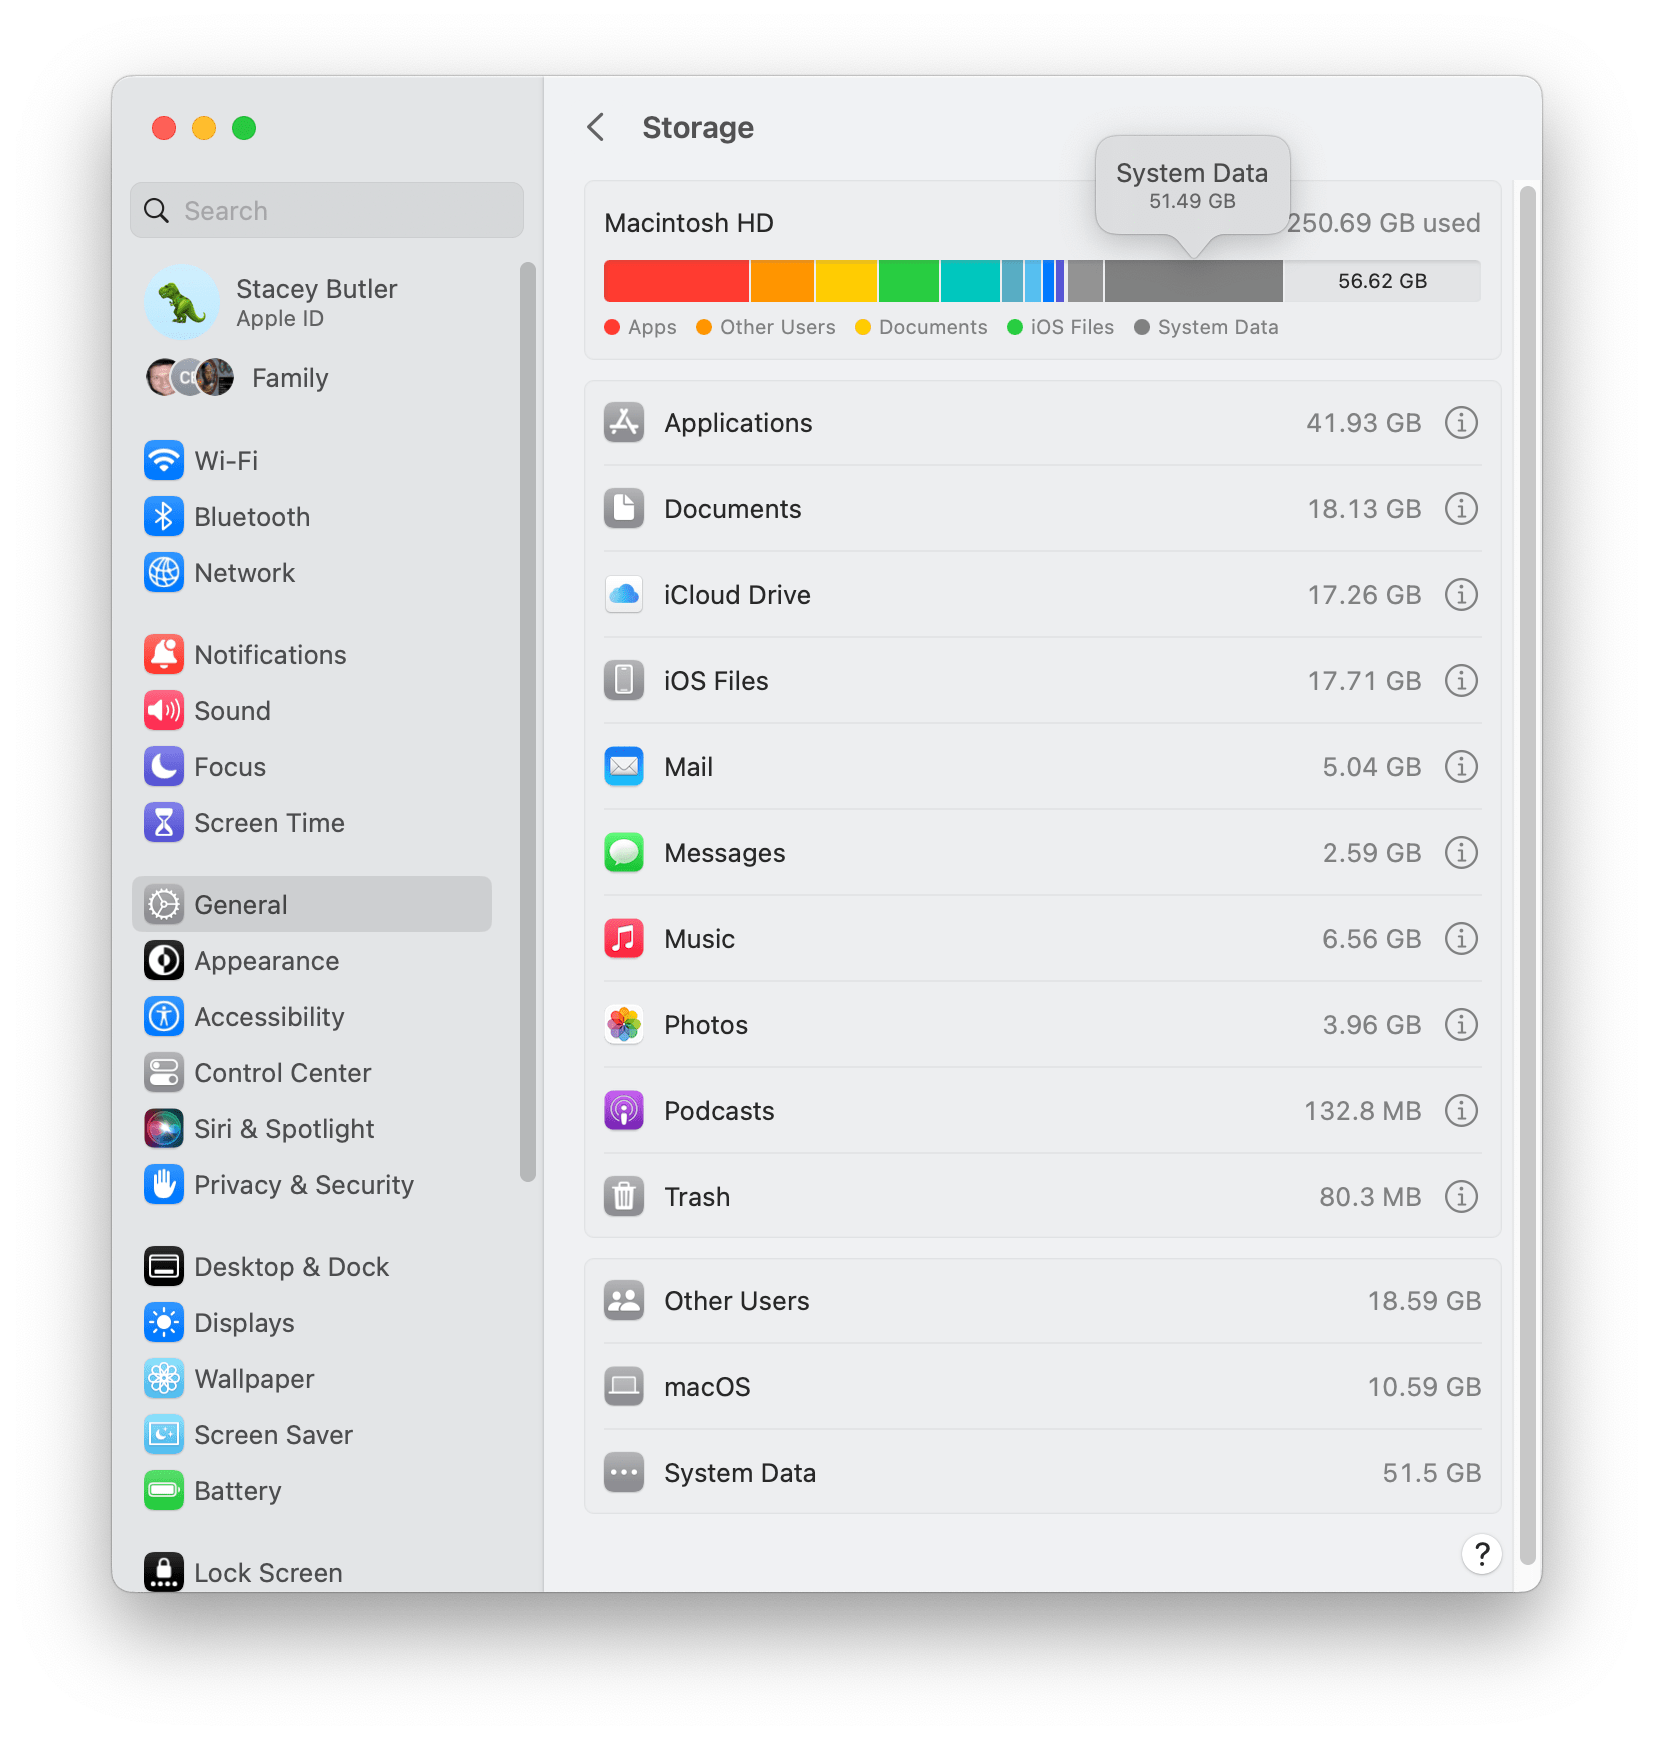
View macOS storage information
First of all, if you haven’t already checked your Mac’s storage:
- Open System Settings and click on General.
- Scroll down to Storage and click on Storage Settings.
For older (pre-Ventura) versions of macOS, go to the Apple menu and click on About This Mac. Then click the Storage tab. You’ll click on Manage for more details.
What is in System Data?
There are a whole variety of files that get lumped under the System Data heading. This includes files used by macOS, which makes sense. But there are other files that get thrown in as well; you’ll find caches, logs, temp files, backups for iPhone/iPad and Time Machine snapshots.
Why is System Data taking up so much space?
Although many users may see the size of their Mac’s system data and want to reclaim some of that space, for most, this is maybe 50GB or less. In some extreme cases, the System Data can take up a TB or more. However, this will impact you differently depending on the size of your storage drive and how much of it you are using for your own files. If your drive is only 125 GB, 50 GB is a lot.
The reasons for System Data taking up so much space varies. It depends a lot on what is taking up the space. Sometimes, the contents of System Data are created by macOS and are temporary and purgeable (like Time Machine snapshots), meaning when the space is needed, the files will be cleared automatically.
However, for some users, there are things they need to clear out or settings they should change to help deflate their System Data. For example, one of the culprits for hogging System Data is Mail logging. In the next section, we’ll give some general tips on clearing System Data and some tips for those more specific problems.
How to reduce the size of System Data
There are a couple of ways to go about this. If you are uncomfortable deleting files, you can try downloading an app that will safely do the work for you. A few widely recommended apps are CleanMyMac X, DaisyDisk (DaisyDisk in the App Store) and GrandPerspective (GrandPerspective in the App Store).
If you choose to delete files, it is always a good idea to make a full backup first.
Specific things to check
We’ll list these first, not because these are the most common, but because if your System Data is inflated for one of these reasons, you will want to focus on the specific cause.
Mail logs
If you set up Mail to log your activity, these logs can eventually take up a lot of space.
- Open Mail on your Mac, then from the top menu bar, select Window.
- Select Connection Doctor.
- If the box next to Log Connection Activity is checked, you are saving log files.
- Uncheck the box. Then you will want to find and delete the log files.
- Click on Show Logs. Select all the log files, then right-click (Control-click) and Move to Trash.
- Empty the Trash. You can right-click on the Trash icon in the dock and select Empty Trash.
Xcode
Xcode is used by software developers. If you don’t know what Xcode is, then it is not the cause of your inflated System Data. It seems some users of Xcode have found that files like old simulators can really pile up if they are not deleted. I’m not an Xcode user myself, so I can’t verify any of the suggestions presented, but you might check out the suggestions in this video on cleaning out unneeded Xcode files.
Content Caching
You can check if you set up Content Caching:
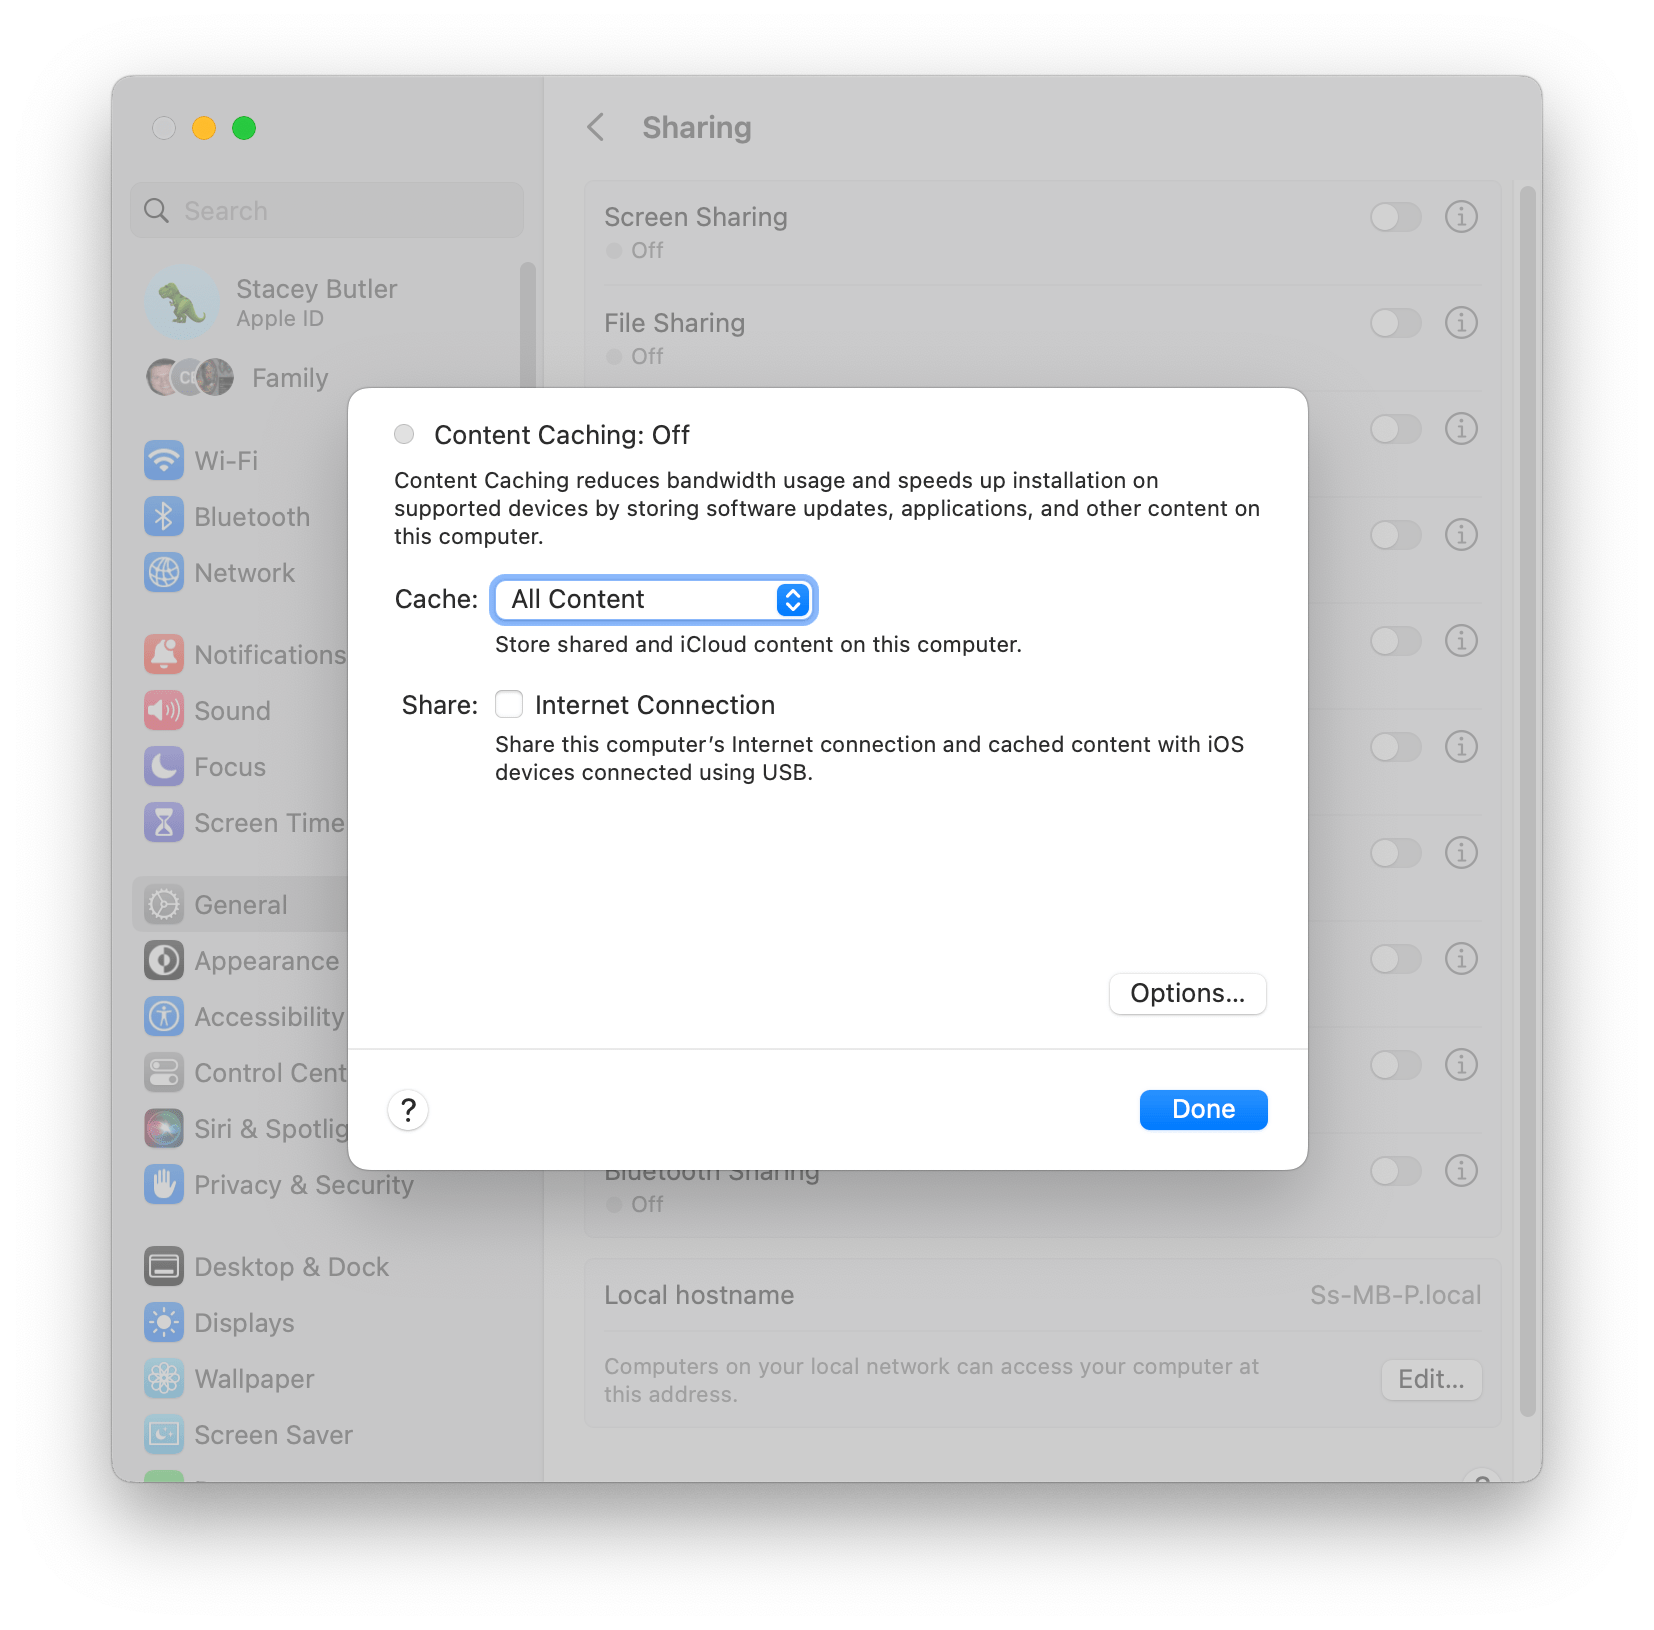
- Open System Settings and click on General.
- Click on Sharing, then if Content Caching is on, you can either turn it off or click on the info (i) button.
- Click on Options and select a smaller Cache Size, then click OK.
Time Machine snapshots
Although you shouldn’t really need to clear these out, it might be an easy way to see how much space these are taking up. Then you’ll know how much space is being used by other things in System Data. You have a couple of choices:
- Connect your external drive and let Time Machine back up to it.
- Turn off automatic backups for Time Machine, then turn it back on:
- Go to System Settings > General > Time Machine or System Preferences > Time Machine.
- For Ventura and later, click on Options, then choose Manually as the back up frequency and click Done. For Monterey and earlier, either deselect Back Up Automatically or turn off using the switch (depending on macOS version).
- After a few minutes, the Time Machine snapshots should be deleted. After you view your remaining System Storage, you may want to turn on automatic backups again.
General tips on how to clear System Data
Try rebooting in Safe Mode
Booting into Safe Mode will clear some cache files.
For Intel Macs:
- Shutdown your Mac: Go to the Apple menu and select Shutdown.
- Press the power button on your Mac and immediately hold down the Shift key.
- When you see the login screen, release the Shift key, then log in. Log in again if necessary.
- After you have logged in, restart your Mac: Go to the Apple menu and select Restart.
For Apple silicon Macs:
- Shutdown your Mac: Go to the Apple menu and select Shutdown.
- Wait for your Mac to fully shut down, then press and hold the power button until you see “Loading startup options.”
- Select your startup disk (Macintosh HD), then press and hold Shift and click on Continue in Safe Mode. Release the Shift key.
- Log in to your Mac.
- After you have logged in, restart your Mac: Go to the Apple menu and select Restart.
Finding other large files and folders
You can get a clue what is taking up space on your Mac by doing the following:
- Open a Finder window and click on Macintosh HD in the left sidebar.
- Press Command–Shift-‘.‘ (Command, Shift and the period key) to show all files.
- From the top menu bar, select View, then Show View Options.
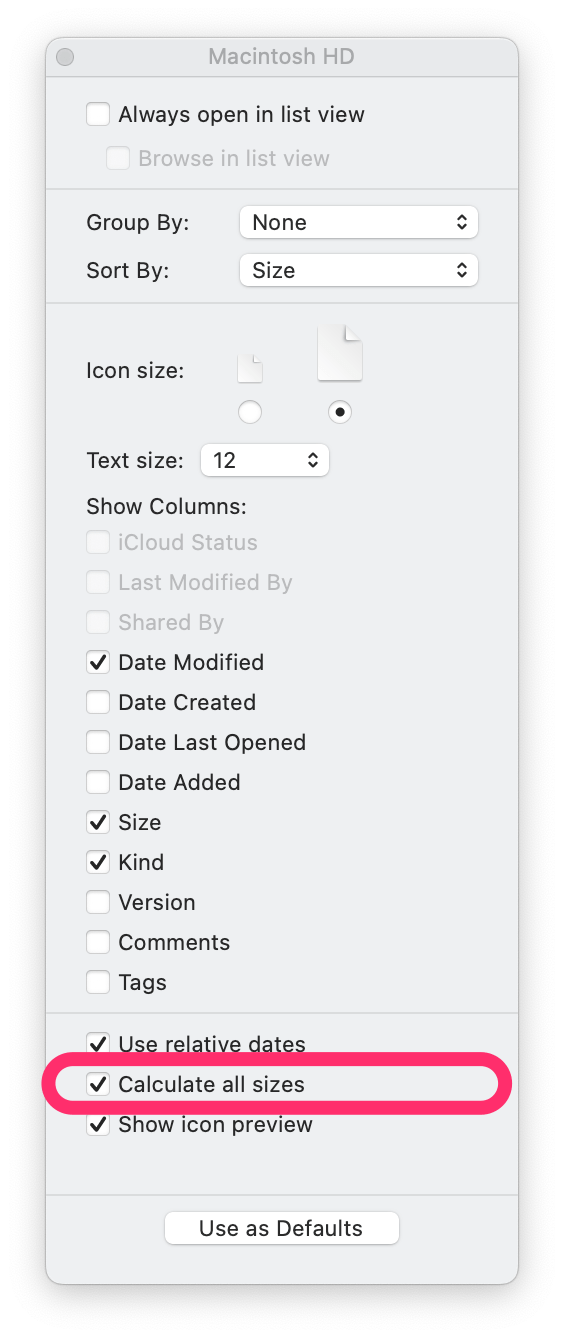
- Check the box next to Calculate All Sizes.
- If necessary, click on the Size column in Finder to sort the files and folders by size.
- Now you can browse through folders to see what is taking up a lot of storage space.
One place you may want to look is ~/Library/Application Support. You’ll find backups for your iPhone, along with data from various apps. Apps known to hog space include Steam, virtual machines and large audio libraries.
How to clear other files: caches, logs, backups
- You can generally delete cache and log files.
- Don’t delete the folders.
- Don’t bother deleting cache files unless they are taking up a lot of space; they are meant to improve performance.
- If you are uncomfortable doing this, then check out one of the Mac cleaning apps mentioned above.
- You could always just look and see if any of these files are taking up a lot of space; that way, you know where your storage space is going.
To get to these folders easily, Open a Finder window, then select Go from the top menu bar. Click on Go to Folder, type in the path and hit Enter.
- You can find caches in
~/Library/Cachesand/Library/Caches. - Log files can be found in
~/Library/Logsand/Library/Logs. - You can find old iOS backups in
~/Library/Application Support/MobileSync/Backup.
Other things to note
- There is a possibility the size of System Data you see in System Settings > General > Storage is incorrect, and System Data is not really taking up so much space on your Mac. If you think this may be the case, you can rebuild the Spotlight index on your Mac.
- If you delete some files to make space and your storage just seems to fill up again (on its own), you may have Optimize Mac Storage on. This isn’t a bad feature; it just moves things to iCloud when there isn’t enough space on your Mac. That means if you make more space on your Mac, files may be moved back to your Mac from iCloud. To check if this is enabled, go to System Settings > [your Apple ID] > iCloud.
Deleting files
If you make any changes, such as deleting files, make sure to empty the Trash, then restart your Mac before rechecking your storage. If you are worried about the effect of deleting files, first make a full backup of your Mac, then move the files you want to delete somewhere, like the desktop. Then restart your Mac and make sure everything is working as it should. Then you can put the files in the Trash and empty the Trash.
Related storage articles

Mail logs was the culprit. Wow what a difference.. Thank you!