How to Downgrade from MacOS Big Sur to Catalina
The latest version of macOS, Big Sur, has come with some nifty enhancements and a nice redesign. However, there are always users who decide they would really like to revert to the previous macOS. Maybe you have recently downloaded and installed macOS Big Sur, but for some reason or another, you want to go back to Catalina. This article will go through the steps you need to take to get back to Catalina.
Downgrading to a previous macOS is definitely more work than upgrading. Before you make the final decision to return to Catalina, if you are experiencing problems with the latest upgrade, we suggest troubleshooting the issues you are having first:
- How to Fix Big Sur Battery Drain Issues
- The Disk “Macintosh HD – Data” Can’t be Unlocked, Fix
- Big Sur Bricking Some MacBooks: Blank Screen after Upgrade
- How to Change the Login Screen Background in macOS Big Sur
Ok, so you’ve decided you really want to downgrade. In order to follow these instructions, make sure you either print them or bring them up on your phone before you begin. In order to complete this process, you will need an external drive. Before you begin the process, make sure you are comfortable with all of the steps required for the downgrade.
1. Backup Your Data
This isn’t just for safety in case something goes wrong. You will be erasing your hard drive and so all your files, data, photos etc. will be gone. You must have a copy saved somewhere else. Options include:
- Use Time Machine to backup your Mac. Time Machine gives you a complete backup solution. If you recently installed Big Sur and haven’t done any work or changed anything you think you need to keep, you may use the backup you created before upgrading.
- Save your important files in iCloud Drive or use other cloud based storage. It’s not nearly as quick or simple to save all your files this way.
- Drag your files to a connected external drive using Finder.
- Use one of many third party apps to backup files to an external drive.
See also: How To Upgrade & Downgrade or Cancel Your iCloud Storage Plan
2. Install macOS Catalina on a Bootable Drive
If you don’t have a backup of your machine from when you were using Catalina, you should save a copy of macOS Catalina onto a bootable drive. If your Mac shipped with Catalina installed, after erasing your hard disk, you may also choose to reinstall macOS from Recovery Mode.
See also: How To Use macOS Recovery
To summarize, after erasing your disk, there are three options for installing Catalina: Recover from a Time Machine backup (only if you have a backup from when you were running Catalina), install Catalina from a bootable drive, or reinstall macOS Catalina (only if Catalina was your original OS).
- Get a copy of Catalina.
- Apple has previous macOS versions available for download on their How to get old versions of macOS page. Find Catalina and click the link. Note: that these installers open automatically after download. You will want to close them because you cannot install Catalina directly on top of Big Sur.
- Alternatively, you should be able to find Catalina in the App Store. Click Get. Confirm the download by clicking Download. Do not click Open.
- Make a bootable installer on a usb drive or other external drive.
3. Erase your Hard Drive
Again, don’t do this until you have backed up your data.
- Restart your Mac: Apple menu () > Restart.
- Immediately press and hold down Command (⌘) and R. Release when the Apple logo appears.
- Select Disk Utility. Click Continue.
- Select your Startup Disk. This is usually named Macintosh HD unless you have changed it. Click the Erase tab near the top of the window.
- Name: You may continue to use Macintosh HD.
- Format: You may continue to use APFS.
- Click Erase Volume Group
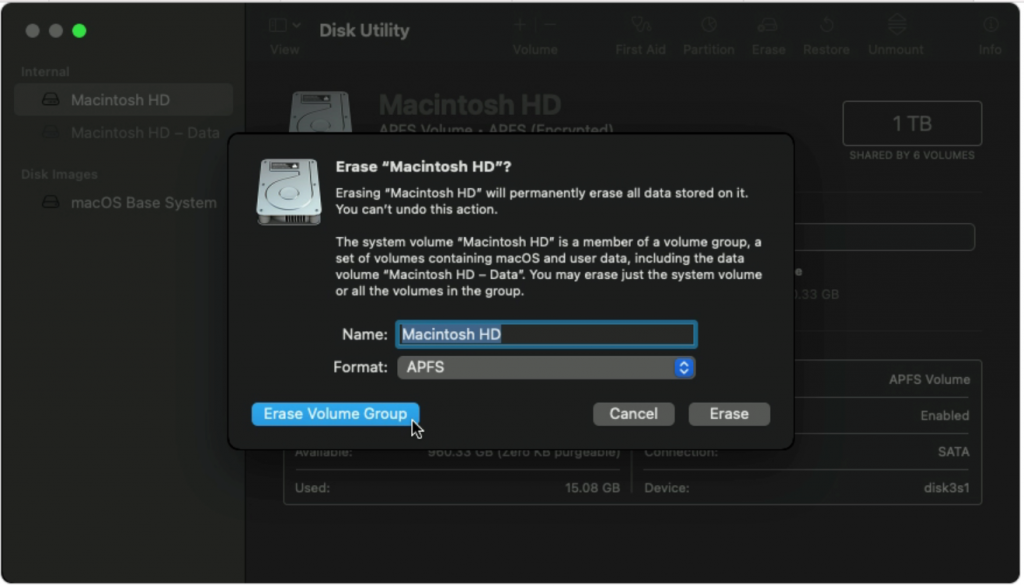
- Enter your Apple ID, if requested.
4. Reinstall macOS Catalina
There are three options for reinstalling Catalina. Make sure you allow plenty of time for the process to complete. Make sure your Mac is connected to a power source and internet.
4a. Recover from Time Machine Backup
If you created a backup using Time Machine before you upgraded to Big Sur, then you can use that backup to restore your Mac to Catalina.
- Connect your external drive to your Mac.
- Restart your Mac in Recovery Mode:
- Power on your Mac. Immediately hold down 2 keys: Command (⌘) and R.
- Release when the Apple logo appears.
- Choose Restore from Time Machine. Then click Continue.
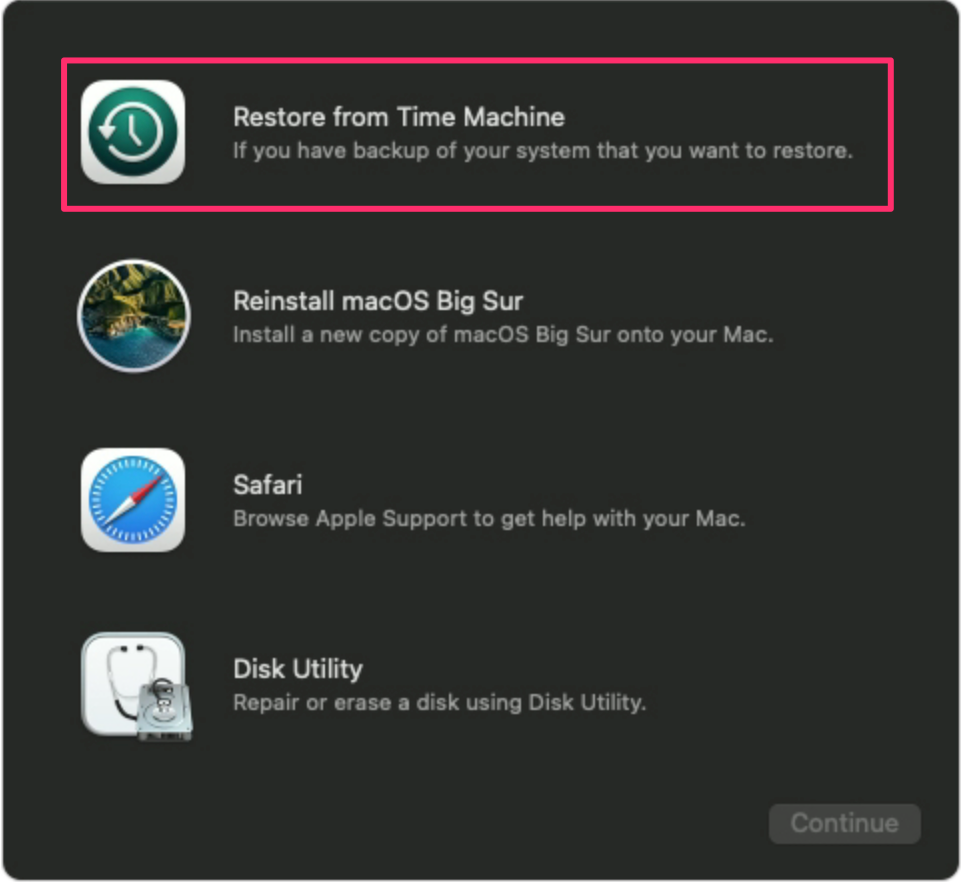
- Click Continue. You should see a screen showing your Time Machine backups. You will need to choose a backup that you made before upgrading to Big Sur.
4b. Install macOS Catalina from your Bootable Drive
- Connect the installer to your Mac. Make sure your Mac is connected to the internet.
- Restart or power on your Mac and immediately press and hold the Option key. Release the Option key when you see a screen showing your bootable volumes.
- Select your bootable installer and hit return.
- Select Install macOS from the Utilities window. Click Continue and follow any onscreen instructions.
4c. Downgrade to Original macOS
You can downgrade to the macOS your computer shipped with. Make sure you are connected to the internet.
- Go to Apple menu () > Shutdown.
- Power on and immediately press and hold 4 keys: Shift, Option, Command and R to load macOS Recovery.
- From the Utilities menu, choose Reinstall macOS. Click Continue.
- Follow the onscreen instructions and choose your startup disk. Click Install.
5. Restore Data from Backup
Now that Catalina is reinstalled on your Mac, you can transfer files that you backed up before downgrading.
Recover Data from a Time Machine Backup
If you made a Time Machine backup before downgrading, you can use Migration Assistant to transfer files from your backup.
- Connect your backup disk.
- Open a Finder window. From the menu bar at the top of your screen, select Go, then Utilities.
- Double-click on Migration Assistant in the Finder window.
- Choose to transfer from a Time Machine backup. Click Continue.
- Select the Time Machine backup you want to use. Click Continue.
- Select the information you want to transfer. Click Continue. If you are transferring a large amount of data, this could take hours to complete.
Recent Articles:

This was well-explained. I’ve now got Catalina, having recovered all my files from my Time Machine. Only problem was with my 300GB of photos. I couldn’t open the photo album, as it had presumably been upgraded to a Big Sur format. I made a new album, by pulling out the “originals” file. But of course, with the newly created album, I’ve lost all the breakdowns into my albums and projects….. Do you have any tricks/easy solutions, aside from reorganising manually all my thousands of pictures?? Many thanks! Ed